Tuesday, May 28

Anniversary Time!

“But at the beginning of creation God ‘made them male and female.’ ‘For this reason a man will leave his father and mother and be united to his wife, and the two will become one flesh.' So they are no longer two, but one flesh. Therefore what God has joined together, let no one separate.”-Mark 10:6-9

Above all, love each other deeply, because love covers over a multitude of sins.—1 Peter 4:8

My husband and I have been married for nine years now.  Hard to believe; it seems like time has just flown by!  I can't speak for the hubby, but the nine years have been happy for me.  Not all of the circumstances that we've faced have been pleasant, but the life we've lived together has given us the strength to persevere through some tough times and stressful trials.  Add to that the faith in God that we both share, and you get a constantly growing and changing (for the better) relationship.  I have no doubts that it will continue to strengthen and deepen as we both age.  This year for our anniversary, we decided to travel back to Gettysburg--we both have such fond memories of the place, and I'd been longing for another trip back to the beautiful eastern Pennsylvania countryside ever since my first trip there in 2010.  My husband has been there at least five times now--he used to go out there with some college friends before we ever met, and he always enjoys it, especially touring the battlefield.  Me, I love the battlefields too, but I especially love the historic architecture.
Culp Farm
Stone wall and wildflowers, north side of Gettysburg battlefield
Great 1700s/early 1800s stone and brick house near the battlefield

Old farm in the haze--it was hot like summer while we were there

We also decided to take a trip to Sharpsburg/Antietam and Harper's Ferry while we were in the area.  I was new to Antietam, but hubby had been there once before.  It was our first time to Harper's Ferry and well worth the drive.  Absolutely gorgeous countryside through the mountains, and Harper's Ferry was nothing like we expected.
Antietam battlefield, from the Visitor Center
Dunker Church--this building was in the midst of the battle
 
The Bloody Lane--many died here
Monuments like these are scattered around the battlefield depicting where a general died--three died on each side
Burnside Bridge
At Harper's Ferry-Church on top of the cliff
Mural painted on the cliff above the old Harper's Ferry Armory remains (the building is gone)--the words are hard to read, but the bottom word is "powder"
Streetscape, preserved by the National Parks Service--looks the same as it did during the Civil War--buildings are shops, restaurants and museums now
Another streetscape, looking down from a hill above

We ate dinner on our anniversary in the upstairs dining area of the Dobbin House, and the food was superb.  We both had a seafood dish...there is nothing like real, fresh seafood, something those of us in landlocked states don't often get to enjoy (no, Red Lobster doesn't count). 
The Dobbin House, built in 1776--see the British flag?
It was another great trip to Gettysburg.  On a sad note, the Boyd's Bears store in Gettysburg closed a few years ago, which really saddened me to learn.  I was really looking forward to going there to get an Abraham Lincoln bear.  Oh well, I was able to get the four Civil War bears from our innkeepers!
Praise to God for the wonderful nine years of marriage that He's blessed us with, and prayer for many, many more!

Friday, May 24

Vanilla Sugar--What Is It, and How Do I Use It?

Ahh, vanilla beans...the pod that keeps on giving.  It's been a few weeks since I posted that I am using the leftover vanilla beans from my extract to make vanilla sugar, something that has been floating around the culinary internet universe for a while now.  Alton Brown has even posted a "recipe" for it on the Food Network website.  If it's made it onto Good Eats, then it's definitely worth exploring, in my opinion!  It's absorbed some of the vanilla bean flavor, and is now ready to use.
So what is it?  It's pretty much what the name implies: white sugar infused with vanilla bean flavoring goodness.  How do you make it?  Easily!  I took the clean jar that I steeped my extract in, and once it was completely dry, I added three cups of white sugar while dropping in my vanilla bean pieces intermittently.  I dropped in one and a half beans total.  I screwed the cap on and shook it, and lo and behold, began to see caviar specks amongst the sugar crystals.  I opened the jar and inhaled, and it smelled like sweet heaven and sugar.  Oh, so good.  One thing I've noticed, though, is that the beans still have moisture in them, despite the fact that I let them sit out and air dry for several days before adding them to the sugar, and this has caused the sugar to clump together.  I've spread the sugar out on a tray to hopefully evaporate the moisture in the sugar, and then I will store it in a container without the beans.
You can use this in place of adding vanilla extract to your recipe, or you can leave the vanilla in and use it as you would regular sugar.  Why not sprinkle a little on your corn flakes in the morning?  Or in your coffee or tea?  Or try it as a substitute for sugar in my French toast casserole recipe:

Ingredients:
½ loaf of Texas toast, torn into pieces
4 eggs
1 cup half-and-half
1/2 cup milk
3 tablespoons vanilla sugar
2 teaspoons vanilla
1 tablespoon cinnamon
1 teaspoon nutmeg
1 stick butter (unsalted is preferred)
1/2 cup brown sugar
1 cup pecans (optional, we didn’t use)


Directions: Spray a 9x13 baking dish with non-stick cooking spray (don't skip this step--we learned that the hard way).  Spread the bread pieces evenly in the pan, then mix together in a separate bowl the eggs, half and half, milk, sugar, vanilla, cinnamon, and nutmeg.  You could add more spices, or additional spices, if you would like here.  Pour this mixture over the bread, and toss the bread to coat the pieces.  Cover with plastic wrap or aluminum foil and allow to sit in your refrigerator overnight.

In the morning, melt the butter, then mix in the brown sugar.  Pour this evenly over the bread mixture, and then bake at 350 degrees for 30 minutes, or until the bread is golden brown on top.  You can also sprinkle more spices over the casserole before baking it for a little extra deliciousness.

Sunday, May 12

Homemade Vanilla Extract After Three Months

I took time today to strain and bottle the vanilla extract that I began "brewing" three months ago.  I was planning on doing some baking today, so I thought it would be a great opportunity to sample this new pantry staple.  When I opened the bottle, the smell was just intoxicating!  I am so excited to have a homemade extract for my baking that I bet I never go back to store-bought again.  The price of the beans and vodka are really not that great for as often as I would be making it, plus I have the added bonus of knowing just what is in my extract.  Win-win!
Since the original post showed only the brewing and storage process, I'll share my straining and bottling process with you now.  Get a container that has a reliable pour spout that won't dribble (you want to save every last delicious drop that you can--three months or more is a long time to wait for more extract), cheesecloth or coffee filter, your clean bottles or containers for the extract, a funnel, and a wet paper towel.  Cover your work surface with paper towels or something absorbent to prevent the vanilla from staining your work surface.  If it does stain, you can clean it by gently rubbing the countertop with a wet toothbrush and some baking soda (as long as you can use a mild abrasive on your counters).

Place the cheesecloth or filter over top of the container, and slowly pour the extract through to strain.  Remove the beans and set these aside for later. 
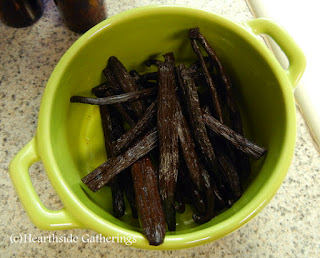
The remains of the vanilla beans.  You can see the little brown caviar specks on the side of the jar.
Using the funnel, pour the extract into the bottles.  I have 8 one-ounce bottles and 2 four-ounce bottles.  The one-ounce bottles are for gifts, if you're nice to me :) .
One 16 oz. jar yields all of this!
Using cobalt-colored or amber-colored bottles are preferred.  The colors of these bottles filter out UV light.  Clear glass is still fine to use, but I'd recommend keeping the clear bottles in a dark place.  To be honest, though, I don't know how UV light affects vanilla extract...it's just been something I've read numerous times when looking into making this stuff.  Just passin' it along to you all.
So, you have your vanilla extract all strained and in the bottles!  Good for you.  Treat yo'self with some delicious baked goodness.

Now, what to do with these leftover pieces of beans?
Vanilla sugar!

Spread the beans in a single layer on a paper towel.  I put a piece of wax paper under the paper towel and spread them out on a smaller baking sheet, but you can dry them however you wish. 
Mix one bean in per cup of sugar, and let it sit and absorb the vanilla flavor for a week or two.  The sugar should start turning light brown as the vanilla is absorbed.  Vanilla sugar just adds a little extra "oomph" to your baking.  You'll be glad you did!

Monday, May 6

Alton Brown's "40 Cloves and a Chicken" Recipe

I've had this recipe in my "to try" queue for a while now, and decided to give it a go on a cheery, beautiful Sunday afternoon.  I had originally planned to just roast the chicken, but then thought, 'Hey. Why not, jack?'  Duck Dynasty is a great show.
The recipe requires olive oil, salt, pepper, rosemary, and garlic.  It requires the chicken to be cut into 8 pieces.  I should mention here that I've never cut up a chicken before.  A rabbit, yes.  A chicken, no--I just roast them whole, or buy pre-cut chicken from the store.  The rabbit was part of a program at the McKinnis house, and wasn't that hard to cut--it had already been skinned, so it just needed to be cut into pieces.  Chickens, on the other hand, still have the skin on, and that just makes everything more slippery and, well, icky.  But after much weeping and gnashing of teeth on the chicken's part, I won, and the chicken became eight pieces. 

This is really an easy recipe.  The hard part was peeling forty cloves of garlic, but thanks to a trusty garlic peeler tube thingy that my mother-in-law gave me a long time ago, even that went pretty quickly.  I love the smell of fresh garlic!  And I fear no vampires now (not that I ever have).
You basically cut up a whole chicken into 8 pieces.  I removed the skin on all of the pieces except the wings, since neither my husband nor I like chicken skin, but chicken wings are hard to remove the skin from.

Then, you peel 40 cloves of garlic and set them aside.
Salt and pepper the chicken pieces.  Brown the chicken in two tablespoons of olive oil, and then move the pieces to an oven-safe baking dish.  Everything I have is too small for holding a whole cut-up chicken.  Guess I'll have to go shopping soon.
Pour a half of a cup of olive oil into the baking dish, then add 10 sprigs of fresh rosemary (which I didn't have, so I just sprinkled some of my dry rosemary over the chicken), and add the garlic cloves.
Bake at 350 degrees for 1 1/2 hours, until the chicken is cooked through but still tender.  Goes great with mashed potatoes and fresh green beans.  Everything about this recipe is just so easy!
For the actual recipe, here is the Alton Brown's Food Network page: 40 Cloves and a Chicken.


Sunday, May 5

Tomato Seedling Surgery 2.0--Learn From My Mistakes

Now He who supplies seed to the sower and bread for food will supply and multiply your seed for sowing and increase the harvest of your righteousness; you will be enriched in everything for all liberality, which through us is producing thanksgiving to God.--2 Cor. 9:10-11

This is an update from the first time I tried to separate tomato seedlings, the post for which you can read by clicking on this link: Tomato Seedling Surgery .  While I was on the right track when I did the original transplanting, I did it at the wrong time, which I have since learned.  When only one of those tomato plants survived the original repotting, but then miraculously had four more plants randomly pop up in that same transplanted pot, I felt that God was giving my naive gardening skills a second chance.  When I saw the little sprouts pop up and start growing, and then thriving, my hope was renewed and I knew I could do the transplanting this time, and it would work!  Yesterday was the day.  I did everything basically the same as I did the first time, only the lesson here is this:

DO NOT SEPARATE TOMATO SEEDLINGS UNTIL THE STEM IS IS STRONG AND HAS THE LITTLE HAIRS ON IT, AND DO NOT SEPARATE THE TOMATO PLANTS UNTIL IT HAS AT LEAST FOUR LEAVES ON EACH PLANT. 

When I transplanted the seedlings before, they were just too young and fragile to be split up, and the trauma of the whole situation was more than they could handle.  This time, all five of the plants growing in the pot had a thicker stem, many leaves, and stronger roots. 
This photo is actually a bit outdated...the seedlings have grown considerably in the week or two that has passed since this photo was taken.  The fact that they were outgrowing their pot was the motivation for me to take this task on once again.  Here's what I did:

With a spoon, I gently scooped out the largest plant.  When I did, the other plants were loosened and came up with the main plant.  Veeeery gently, I separated all of the plants, and scooped a fairly deep hole in the empty transplant pots.  I buried the plants deeper in their new pots, to give the plant more stability.  With tomatoes, the little hairs on the stems are actually roots, so you can plant them deeper and not worry.  I added potting mix and watered them thoroughly, and it worked!  So I am happy to report that as of this moment, I think I'll have five tomato plants for the garden this year.  This will make the hubby happy, and when the hubby's happy, I'm happy.  So now you know that it's possible to transplant and separate seedlings when more than one seed grows in the pod, and you also know how long to wait before trying to separate them.  Learn from my mistakes!  It's why I share them with others.
Five tomato plants.  I had a sixth pot ready,  but didn't use it.  Now it's just there for visual balance, because I'm weird.


ShareThis