Showing posts with label dairy-free recipes. Show all posts

Tuesday, January 13

GAPS Diet, Stage 1 & 2

The GAPS diet is supposed to be a really good diet for healing and sealing your digestive system, especially if you have (or have developed) problems like I have.  I believe that I have leaky gut, which has led to an inability to eat anything dairy-related (a good description of leaky gut can be found here).  I needed to heal my dairy allergy and prevent new ones from developing, so we started the Intro Diet on January 1.  I have to say, I thought I was somewhat prepared, but I knew that it was going to be a lot of work.

That was the understatement of the year (so far).

Meatball soup
The first stage might be considered the hardest; however, there's little difference between the first and second stages, so maybe they should just all be one looong stage.  But it seems to be the foundation for healing, so I won't complain.  We spent a total of 3 days on the first stage, and then four days on the second stage, which consists of eating lots of homemade broth, soups made from the broth, meat, certain veggies, and a lot of fat.  In the second stage you can also add egg yolk to the soups for more protein and nutrients.  I ended up ordering leaf lard online from Tendergrass Farms, and have been using it faithfully to add fat to the already fatty soup stocks--you're supposed to have a large amount of animal fat along with the homemade broth, as both are supposed to contain a lot of healing minerals and nutrients essential for the intestinal lining.  The high fat content also helps to keep you feeling full after you've eaten, and it really did seem to do that for both of us.  In fact, we really had little appetite when we started!  We've come up with several recipes for soup, all of which contain meat, carrots, zucchini, squash, yellow squash, onions, broccoli, cauliflower, and leeks.  Soups do get old when you have to use the same ingredients over and over again, but we did come up with one that we really liked: meatball soup!  Recipe at the bottom.

We experienced some die-off symptoms over the first three days, but they seem to have leveled out.  We're both ready for "real food" instead of soup for every meal, but it's so important to remember that this is good for us.  I've had success making sauerkraut, and will be adding the juice to our diet to up the probiotics.  Thanks to my sister for an Amazon gift card and to a friend for recommending the Picklemeister (left)!  It's a great invention, and I had sauerkraut on my first attempt using it.

My summary of Stage 1 & 2:
It's very tough.  It's especially hard when you are completely changing your eating to reflect this healing mindset.  I don't know how families do it together, because it's also incredibly expensive (and we've only been doing what we can, so not 100% following the guidelines), it's time consuming, and the food really isn't that great.  However, my hubby and I have already lost some weight, and and I think I've felt a little better.  Dairy still doesn't agree with me, though, as I found out when I thought it'd be fun to try and add some clarified butter to a bowl of soup one morning.  Oh well.  I think that if you can make it through the first and second stage, you'll be okay. 

Okay, running out of time.  Here's the recipe for the meatball soup:

GAPS-friendly Meatball Soup (still good if you're not on GAPS)
Ingredients:

1 lb. ground beef
1 lb. ground pork
2 qts. beef stock
1 qt. water
1 C (8 oz) broccoli florets
1 C (8 oz) cauliflower
1 medium onion, cut into large chunks
2-3 TBSP lard
Salt, pepper, sage, rosemary, thyme, dill to taste
4 cloves chopped garlic

Combine stock, water, broccoli, cauliflower, and onion in a large (7 qt) pot and cook veggies until soft.  While veggies cook, combine ground beef and pork in a bowl with plenty of salt and pepper.  Form into one inch balls and set on a plate.  When veggies are semi-soft, add meatballs, one at a time, to boiling stock.  Allow to continue to cook for another 20 minutes, or until the meatballs are cooked through.  Add salt, pepper, herbs and garlic and cook for another 10-15 minutes.  Yields approximately 6 servings (approximately 12 cups).

Thursday, December 11

Preparing for GAPS

Stock!  Lots of stock!
Last weekend was quite a weekend!  The last several weekends have been so busy.  In the midst of the holiday prepping and planning, I'm also trying to prepare for our upcoming foray into the GAPS diet to help me overcome my recently-developed intolerance to all dairy great and small.  Part of prepping has been to try my hand at making bone broth.  It's quite easy--just takes time.  It seems like everything takes time...but I'm believing more and more that good things truly are worth the wait.  I'm gaining more appreciation for making things like this!  I've always liked to make things from scratch, but I don't always have time to do so.  However, I know that much of the diet relies on homemade broth, and I imagine that it will go quickly, so the more I can make, the better!  I now have accumulated 14 quarts of chicken broth and 8 quarts of beef broth, which should get us going.  One things I'm having trouble with is getting the gel consistency in my broth, but it has a good flavor.  I'm thinking that I need to boil it down more to get the gel.

I was able to buy some grass-fed beef bones from a local farm,
along with some grass-fed chicken feet (never thought I'd say that!) to add to the chicken broth.  I have to admit, I felt like I was buying my first voodoo kit when I ordered two pounds of chicken feet over the phone.  I'm told they add a lot of gelatin to the broth, which is great for the intestinal lining.  The look a little ghoulish floating around in the pan, though!


As well as preparing for the diet, we've also been trying to eat all of the food in the house not allowed on the diet, so I took the opportunity to create a chicken soup using a quart of homemade broth (not a GAPS-friendly recipe, but pretty tasty):
  • Two potatoes, cubed and boiled to fork-tender and drained
  • Two cups frozen peas
  • Two cups cubed cooked chicken, dark and white meat
  • One quart (4 C) chicken broth
  • Two tablespoons corn starch dissolved in two tablespoons cold water
  • Oregano, basil, salt, pepper, garlic powder, chicken base, and other seasonings, to taste

Add all ingredients except corn starch slurry into a 5 quart pot and heat to simmering.  Add corn starch slurry to pot and allow to simmer until desired thickness is reached.

While I was at it, I also decided to try a bag of einkorn flour that I purchased online from Jovial Foods.  It's made from unaltered, non-GMO, non-hybridized wheat that is easy to digest and does not seem to affect people with gluten intolerance (not to be confused with Celiac).  I used it to make some dinner rolls to go with my soup, and they turned out very nice--they browned well, had a good texture, and had a really nice, light flavor.  Hubby liked it, too!  Once we're done with GAPS, I'll be purchasing a larger quantity of this flour and using it as a regular flour staple in my pantry.  It seems to corroborate the suggestion that the altered wheats available today to make our flour really is harder for our bodies to digest.  I thought it was interesting.  (P.S.--this isn't a sales pitch, and I wasn't compensated for mentioning this flour.  I was just pleasantly surprised with the product!)


While I was at it, I came up with this fun Christmas decoration:

I found a gallon Ball jar at Wal-Mart for $14, found the glittery balls at Hobby Lobby, three bags at half price for $10, and I had purchased the fun Christmas twigs on clearance last Christmas.  The silver picks have battery-powered lights wrapped on them.  I tried to make each color of the balls in the jar as individual layers, but as you can see, when I was arranging the picks, some of the different colors mixed layers.  I still think it looks good!  I might just shake it all up and mix them together.

I'm not sure if I'll be back on here before the New Year.  It's just so busy this time of year.  So I'll wish everyone a very Merry Christmas, and hopefully be back at it at the beginning of 2015!

Image from Little Birdie Blessings

Thursday, November 20

November Noms

This flock of turkeys crossed the road in front of me on the way to work this week.  Seems appropriate, with Thanksgiving so close!
I can't believe how quickly time is moving!  It seems like just last weekend that we were in our cabin in the woods, but it wasn't.  We've had a steady stream of visitors during the weekends, and the weeks have been busy as well.  It doesn't look like it's slowing down, either.  Despite all of the activity, I thought I'd share a few dairy-free recipes that I plan to make for Thanksgiving this year.

I've dreaded the approach of the holidays because of my food issues.  I know that they will have to be worked around, and it's frustrating to need food specially prepared to avoid getting sick.  Because of this, I've decided that I'll start the GAPS diet protocol at the beginning of the year, and see if I can get this dairy allergy or intolerance cleared up and my body healed.  I know others who have done it, and they have seen great improvement over the course of the diet.  Best of all, it's not a long-term diet, per se: you do it for up to two years, but then can go back to normal life with a healthy, rebooted digestive system.  Sounds exactly like what I need.

And now, the recipes!

Dairy-Free Pumpkin Pie (original recipe from godairyfree.org--to see the recipe click here):
  • 1/2 Cup Brown Sugar, firmly packed
  • 1/4 Cup White Sugar
  • 1 Teaspoon Ground Cinnamon
  • 1/2 Teaspoon Ground Ginger
  • 1/4 Teaspoon Ground Nutmeg or Allspice
  • 1/4 Teaspoon Ground Cloves
  • 1/2 Teaspoon Salt
  • 2 Large Eggs
  • 1 15-ounce Can Pumpkin Puree
  • 1 Teaspoon Vanilla Extract
  • 1 Cup Regular Canned Coconut Milk
  • 1 Unbaked Pie Shell

Preheat your oven to 425ºF.
Combine the sugars, cinnamon, ginger, nutmeg or allspice, cloves and salt in a small bowl. In a large bowl, beat the eggs. Beat in the sugar mixture, pumpkin, and vanilla until smooth. Fold in the coconut milk.
Pour the filling into the unbaked pie crust and bake for 15 minutes. Reduce the temperature to 350ºF and continue to bake for 50 to 60 minutes, or until a knife inserted comes out clean.  Allow the pie to cool on a wire rack for 2 hours (be patient--this is important).  Serve or refrigerate until ready to serve.

I added a much larger amount of spices than are listed above, so feel free to adjust the spices to your taste.  I also think I might bake this without a crust and see what happens!

Dairy-Free Mashed Potatoes:
  • 2-3 lb potatoes, peeled, cubed, and boiled to tender
  • 1 stick Earth Balance dairy-free margarine
  • 1 small can vegetable broth
  • Salt & pepper

Mash the cooked potatoes.  Add the margarine and mix.  Add enough vegetable stock to achieve the desired consistency of mashed potatoes.  Add salt and pepper to taste.

Cloverleaf Dairy-Free Dinner Rolls (not gluten-free):

Ingredients:
1 package quick-acting active dry yeast (2 1/4 tsp. or 7 grams)
1 1/3 cup milk (105º to 115ºF degrees)
3 to 3 1/2 cups flour or whole wheat flour
3 tablespoons oil
1 tablespoon sugar
1 teaspoon salt
1 tablespoon melted butter
coarse salt (optional, I don't use it)

Dissolve yeast in warm milk in electric mixer bowl.  Stir in 1 cup flour. Beat until smooth.  Stir in enough remaining flour, oil, sugar and salt.  Mix on low electric speed until soft dough forms.  Cover and let rise in warm place until double, about 45 minutes.

Heat oven 400ºF degrees.  

Prep a 12 cup muffin pan with non-stick cooking spray.
Punch down dough in center and fold over a few times.  Pinch off 1 inch balls of dough and quickly roll in palm of hands.  Put 3 balls to one muffin cup; brush with melted butter; sprinkle with coarse salt.

Bake 12 to 15 minutes, until crust is light golden brown.

Immediately remove from pan.  Store loosely covered. - See more at: http://hearthsidegatherings.blogspot.com/2012/12/twelve-days-of-christmas-recipes-day-4.html#sthash.EWGoojoY.dpuf
Ingredients:
1 package quick-acting active dry yeast (2 1/4 tsp. or 7 grams)
1 1/3 cup milk (105º to 115ºF degrees)
3 to 3 1/2 cups flour or whole wheat flour
3 tablespoons oil
1 tablespoon sugar
1 teaspoon salt
1 tablespoon melted butter
coarse salt (optional, I don't use it)

Dissolve yeast in warm milk in electric mixer bowl.  Stir in 1 cup flour. Beat until smooth.  Stir in enough remaining flour, oil, sugar and salt.  Mix on low electric speed until soft dough forms.  Cover and let rise in warm place until double, about 45 minutes.

Heat oven 400ºF degrees.  

Prep a 12 cup muffin pan with non-stick cooking spray.
Punch down dough in center and fold over a few times.  Pinch off 1 inch balls of dough and quickly roll in palm of hands.  Put 3 balls to one muffin cup; brush with melted butter; sprinkle with coarse salt.

Bake 12 to 15 minutes, until crust is light golden brown.

Immediately remove from pan.  Store loosely covered. - See more at: http://hearthsidegatherings.blogspot.com/2012/12/twelve-days-of-christmas-recipes-day-4.html#sthash.EWGoojoY.dpuf
  • 1 package quick-acting active dry yeast (2 1/4 tsp. or 7 grams)
  • 1 1/3 cup dairy-free milk (105º to 115ºF degrees)--I used So Delicious Unsweetened Coconut Milk
  • 3 to 3 1/2 cups bread flour or all-purpose flour
  • 3 tablespoons oil
  • 1 tablespoon sugar
  • 1 teaspoon salt
  • 1 tablespoon melted dairy-free margarine (optional)--I used Earth Balance Soy Free
  • coarse salt (optional, I don't use it)

Dissolve yeast in warm milk in a stand mixer bowl.  Mix in 1 cup flour using dough hook. Mix until smooth.  Mix in two cups of remaining flour, the oil, the sugar and the salt.  Mix on low electric speed until soft dough forms.  Add up to 1/2 cup of flour if necessary to make a soft dough.  Cover and let rise in warm place until double, about 45 minutes.  Heat oven 400ºF degrees.  Prep a 12 cup muffin pan with non-stick cooking spray.

Punch down dough in center and fold over a few times.  Pinch off 1 inch balls of dough and quickly roll in palm of hands.  Put 3 balls to one muffin cup; brush with melted butter; sprinkle with coarse salt.  Bake 12 to 15 minutes, until crust is light golden brown.  Immediately remove from pan.  Store loosely covered.


Have a wonderful Thanksgiving!!

Sunday, September 7

Dairy Free Pizza...It Can Be Done

If you've been reading my blog for a while, you'll know that I recently discovered that I can't tolerate dairy anymore without having health problems.  Because of this, I've had to cut out dairy, including cheese, butter, milk, cream, etc., etc.  One thing that I really miss is pizza.  I miss the gooey, stringy cheese, and there is just no substitution for it.  However, I think I might have found a way around it!

In honor of Sunday afternoon football, which is on TV now, here is the play-by-play of my new recipe for dairy-free pizza.  This recipe makes one pizza and breadsticks.

Here's the lineup!
Playing offense:
#1, Olive oil (QB)--Cal Tech
#2, Refrigerated pizza dough (or use your favorite recipe) (C)--University of Iowa
(At the time of writing this post, the Pillsbury pizza crust is dairy-free)

#3, Hummus (G)--Purdue University
#4, Pizza sauce -- store bought or homemade (T)--University of Tennesee
#5, Earth Balance spread (RB)--Indiana State University
#6, Garlic salt (WR)--University of Michigan
#7, Garlic powder (TE)--University of Michigan

#8, Nutritional yeast flakes (optional) (T)--University of Phoenix

#9, Toppings of your choice (second string)--I used arugula, spinach and diced tomatoes

Here are the plays:
First, preheat your oven to 400 degrees.  Drizzle olive oil onto a large baking sheet with shallow sides.  Use your fingers or a paper towel to spread the olive oil around to coat the pan completely.

Next, tear a small chunk of dough off of the roll.  Set it on one side of the pan.  Press the larger chunk of remaining dough into a round or rectangular shape, to your desired thickness.  Do the same for the smaller piece of dough--these will be your breadsticks.

Now, drizzle a small amount of olive oil onto both pieces of dough, and spread evenly.

Spread hummus onto the larger piece of dough--use as much or little as you'd like.  It's your taste.
Dab pizza sauce on and spread it evenly.

Drop small dollops of Earth Balance spread onto the top of the pizza sauce.  Drop small dollops of EB onto the breadstick dough and spread to create an even layer.


Sprinkle both doughs with garlic salt to your taste.  Dust the breadstick dough with a layer of garlic powder.

Sprinkle nutritional flakes onto the pizza dough.

If using meats like pepperoni, etc. (or anything that needs to be baked), add them now.

Bake for 15-20 minutes, until the dough turns golden brown on the edges.

While the dough is baking, prep your toppings.  I washed and tore the greens into bite-sized pieces, then blotted them dry on paper towels.

Once the pizza is baked, remove from the oven and add the rest of your toppings.  Eat right away!

A side note--my crust was a bit soggy in the middle, presumably from the liquid in the hummus and sauce.  To solve that problem, pre-bake your crust for 8-10 minutes to give the center a chance to cook before adding the other ingredients.  I used a refrigerated dough because I didn't have time to make my own dough, but I think it would be even better with a homemade crust.

Final score: Andrea, 7; pizza with cheese, 0!

If you try this, let me know what you think!

Thursday, July 24

Making Clarified Butter

Every year, a little before Thanksgiving, butter would go on sale at the local grocery store.  Every time it did, I picked up several one-pound boxes to freeze and use for holiday baking.  It was a great system, and I always had plenty of extra butter after the holidays were over.

Now that I can't eat regular butter without feeling like a nauseated bloated cow, I have a LOT of butter in my freezer looking for a reason to live.  (Note: allow frozen butter to come to room temp before clarifying.)

Enter: clarified butter. 

The process is easy enough: just heat the butter on the stove, skim off the white whey foam, and leave the casein in the bottom of the pan.  Knowing that those proteins give me problems, but still wanting to use butter for cooking, I thought to myself, 'Self, clarified butter may be an option!'  After doing a little internet research, I felt confident to try making it myself.

I set to work clarifying the butter:
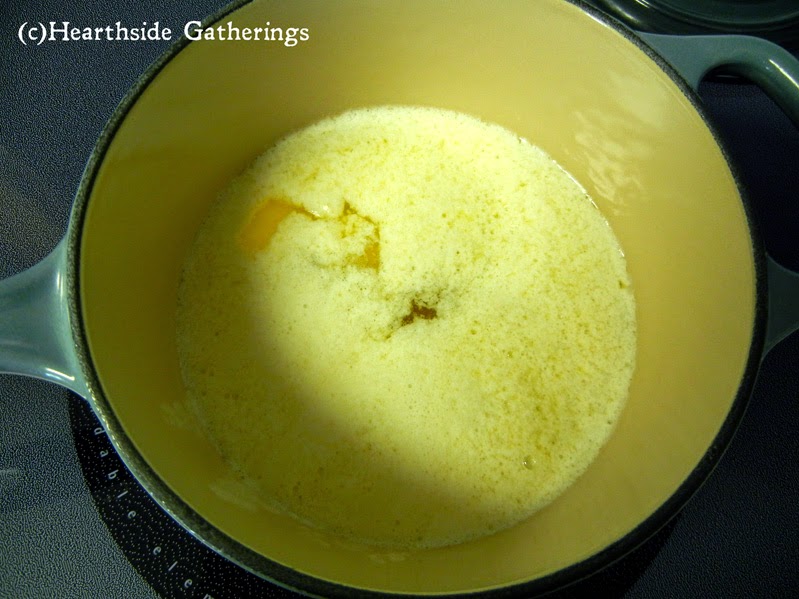
I melted four sticks (2 cups/16 ounces) by cutting it into pieces and turning the burner on low while I did a few other kitchen tasks.  Butter melts quickly, so it didn't take long for the pieces to melt and the whey to float to the top.

Look at all of that whey!

I skimmed out most of it, and I learned that you'll always scoop a small amount of butter out along with the whey, no matter how careful you are.  Sad, but true.  You also have to be careful not to stir the butter and mix together everything that you've just separated.
Anyway, it's not important to skim all of the whey off, we'll get it in a minute.

Line mesh strainers with at least four layers of cheesecloth.  More layers will catch more impurities, so it's best to not be stingy here.  Set the strainers over a large bowl with a pour spout and pour the butter through the strainer.


As you can see, the first strain still left some whey. 
I also couldn't see any casein in the bottom of the pan before I poured it, so I poured it all through.  It was only after I had it in the clear glass bowl that I could see a thin layer of a more solid substance at the bottom that was the casein. 
You can see the brighter color of solids at the bottom--I circled it in the photo below.

I lined another mesh strainer with eight layers of cheesecloth this time, and poured the contents through the second strainer, holding back once I saw the layer of casein at the bottom.  Only a very small amount made it into the second strain, and no whey made it through.

After the second strain, it looked good.  You can strain it as many times as you'd like, but remember, the more you strain, the less the amount of pure butterfat that you'll have in the end.  After straining twice, I had a little over a cup of butter, or a little more than half of what I started with.  Since this was my first attempt, I'm hoping I will get better at it the more I do it, and have more left after the straining process.
But the real test came when I made dinner--I fried chunks of chicken in the butter, made buttered noodles, and boiled up some buttered peas.  It might seem like butter overkill, but if I couldn't handle that, I'd have known quickly.  You can see that the butter melted clear, which was a great sign of lack of impurities.  
The chicken cooked up beautifully, with that perfect brown color, and the butter didn't smoke and burn like it normally does with the impurities. 
The taste was the familiar butter flavor that I love.  And I'm happy to report that I didn't feel bad that night, and still felt well the following morning.  I think this is going to work!  My frozen butter now has a reason to live again.
I've yet to try baking with clarified butter, but it'll be in my to-do list in the next few weeks.  I'll pass along results and any good recipes.

One thing to note: storing the clarified butter in a jar like this is not the easiest method for getting butter out.  I've purchased these molds on Etsy from Cannaware.  You can see that not only do they make sticks of butter like you can buy at the store, but they also have tablespoon measurements on the side to make life easier.  After I clarify my butter, I can make them into sticks for easier storage, access, and measuring.  Win!

Thursday, July 17

Dairy Free By Necessity

I love you, milk.  I love you, ice cream.  I love you, cheese.  I love you, butter.  But it turns out that you guys do not love me anymore.

It's not you, guys, it's me.  I'm sorry, but it seems as though my intestines have decided it's time to break up.  I have no say in the matter.  If it was up to me, we'd continue our dysfunctional love affair.

After thousands of dollars in doctor visits, medical procedures, and test results that yielded no answers, I've come to the conclusion through the process of elimination that I believe I'm dairy intolerant, and that it has been a main cause of of my stomach and digestive problems for over a year now (although, I believe that there's still more going on).  However, I don't believe that I'm lactose intolerant.  I believe that it may be more than that, and that one or both of the proteins found in dairy products may be to blame--casein and whey. 

Why do I believe this?  Well, there are a few reasons.  First, my lactose breath test came back normal.  Second, I can't drink lactose-free milk without problems.  Third, yogurt (which I don't like anyway) and cheese still make me feel ill, and in theory, they shouldn't if I had just a simple lactose intolerance.  Even butter in large quantities, like using it to saute food, causes me problems and discomfort, and butter has almost no lactose.  All of these products, though, still have milk proteins in them.  So, by process of elimination, it seems more likely and logical that the intolerance would be a result of an inability to tolerate the proteins as opposed to the lactose.

I've noticed that eliminating these foods have made me feel better (although still not completely normal), and that makes me sad.  Who wants to voluntarily give up pizza?  Because, let me tell you, pizza with no cheese is not pizza.  Not to me, anyway.
Image from the Internet.
While this type of intolerance is lesser-known than its brother lactose intolerance, it's becoming more known and talked about.  Thankfully, we live in a day and age where so many special recipes can be found online, or adapted to include non-dairy alternatives for their dairy counterparts.  Because of this, I'm starting a page here for recipes that are dairy-free.  This does not include egg-free; that's usually in a category of its own.  It is also important to note that this is not a milk allergy--food allergies are much more serious and can result in a hospital visit.  People with milk allergies cannot have any milk products.

It's fairly common to become lactose intolerant as we age, but other than a mild intolerance to milk for my husband, I know very few people who have this problem.  This is a huge lifestyle change, and I'll admit, it's been a struggle.  Removing dairy has frustrated me in ways I can't even describe, not only in cooking at home, but also in grocery shopping and eating out or at the homes of others.  Plus, it's been very difficult to give up foods that I love cold-turkey, like ice cream and cheese.  I can only sit by and drool longingly as my husband eats his Talenti gelato or cheesy pizza, knowing that for as long as I live, I won't be able to eat some of the things I loved anymore.  But not all is lost--I've discovered some ways around my intolerance.  Below is a small list of things I've discovered.

Some good alternatives to using butter in baking and cooking:
  • Lard (if you can find it)
  • Olive oil (plain or infused)
  • Coconut oil (solid up to 78 degrees) 
  • Clarified butter or ghee (often sold at health food stores) or you can make your own (coming soon!!)
  • Earth Balance spreads (made of various vegetable oils--they do offer a soy-free flavor)
  • Cooking sprays, like Pam
  • Almond, rice, oat, or coconut milk (I use unsweetened coconut milk for most baking recipes, sweet breads, pancakes, etc.)

Foods that I like:
  • A decent dairy-free ice cream I've found: So Delicious brand Peanut Butter Zig Zag, but this is a soy-based ice cream, and some people are adamantly opposed to soy products.  It's been the best substitute for real ice cream that I've found.  Coconut and almond-based ice creams tend to have a coconut or almond flavor to them, regardless of the overall flavor of the product.  It's a bit pricey for what you get, though.  I can usually find this at Kroger.
  • I've tried some imitation cheeses, and am sad to report that they are just not good, especially the Daiya brand.  Don't waste your money.
  • Enjoy Life mini chocolate chips and mega chunks--these are great!  I think they have better flavor than the regular chips.  The only drawback is the price, around $4.50 a bag.  However, they are easily found in most large chain grocery stores--Meijer carries them in their gluten-free section in my town.  I just pick up a bag whenever I go grocery shopping to try and stock up slowly.
I've scoured Pinterest for recipes and ideas for dairy-free living, and have had some success.  I haven't tried many of the recipes on there, but I have tried some.  Feel free to visit my Dairy Free Pinterest page for substitutions, ideas and recipes that I've found so far.  Another great website for all things dairy free is the Go Dairy Free site.  They have a wealth of dairy free information, including recipes, substitutions, and Q&A forums.

Here's a helpful printable with some great non-dairy conversion suggestions (I have not tried these yet, but I do keep this in my kitchen):

And just a little picture of a puppy to make your day a little more fun:

ShareThis