Showing posts with label Crafts. Show all posts

Sunday, March 23

Spring Basket/Easter Basket Craft

In honor of March being National Craft Month, I have a craft to share!

I have a thing for glitter.  I love it.  You might have guessed that from the numerous craft posts that I've done with glitter as a main "ingredient".  I think that glitter makes everything better and more beautiful.  Have an old pair of shoes that just don't look good?  Put glitter on them!  Suddenly you're Dorothy and have just landed in Oz.  Did you get an F on your most recent school assignment?  Cover it with glitter and stick it proudly on the fridge!  Everyone will be so impressed.
My hubby, however, does not like glitter.  Whenever he sees my glitter box or glitter containers out, a look of fear washes over his face, and the utterance of "oh, no" may escape from his lips.  He knows that when I get the glitter out, he will find it EVERYWHERE.  Despite my best attempts to contain the bio-hazardous material, he will eventually find a fleck or two smack-dab in the center of his forehead, but only after he has had a super-important meeting with someone at work. 

What has this to do with a project?  Well, in an attempt to get myself out of the winter doldrums and into the spring spirit, I bought some supplies to make a spring-themed basket: a pretty blue wire basket, some green moss, some wide ribbon, and two packages of wooden eggs.  Do you see where I'm going with this?  You got it--a sparkly springtime egg basket!

Since we don't do Easter bunny stuff (because 1: we don't have kids, and 2: even if we did, we probably wouldn't do Easter bunny stuff), I'm calling this a spring egg basket, which can sit out as a decoration until the temps outside finally warm up--which might not be until July, so I figure that I'll get plenty of use out of this cute little basket.

First, gather your supplies:

  • Wooden Eggs (Hobby Lobby, $4/pk of 4, or less if they're on sale or you have a coupon)--these should be in the woodworking aisle/section
  • Basket of your choice
  • Moss (I found mine in the floral section)
  • Decorative ribbon of your choice
  • All-purpose glue
  • Glitter colors of your choice (spring colors are nice!)
  • Paint brush
  • Acrylic sealer (always a good idea to help with glitter flaking, although some glitter will come off regardless)
  • Paper plate, newspaper, etc. to protect your surfaces and collect extra glitter

Next, prepare your basket:

I laced my ribbon through the openings on the side of the basket.  If you can't do that, you can opt to either just tie it around the bottom, wind it around the handle, make a big bow, etc.  Do what looks good to you!
I only laced the ribbon through two spokes in the back of the basket to keep it in place.
Tie a big pretty bow and trim the ribbon to your desired length.

Fill the basket with moss:

Then, the glitter!
Paint the eggs with the all-purpose glue and sprinkle on the glitter, making sure to not leave any bare spots.  It might take a few applications.  Allow to dry.


I held the eggs with my finger at the top and thumb on the bottom, and turned it as I painted on the glue.  I let them dry and then went back and painted the egg's top and bottom, holding it gently in the middle.


If it's warm enough, take the eggs outside and spray them with the acrylic sealer.  Allow the sealer to dry overnight in a well-ventilated area.  If it's not warm enough where you live yet, just wait until it is.  The glitter will be fine until then, as long as the eggs are not handled much.

Voila!


Because I had some of the supplies for this, like the glitter, glue, and acrylic sealer, this project cost me well under $25 for the remaining supplies.  This is a pretty family/kid-friendly project, and you can keep the eggs forever as keepsakes, as opposed to real eggs that get peeled and eaten.  If you don't want the mess of glitter, though, just use regular acrylic paints and let the kids decorate them that way!

Sunday, November 24

Making a Grungy Primitive Ornament

Let me start this post with two confessions that will make sense in a moment:

I love primitives.  I love colonial American architecture, decor, and life. 

I hate paying for things.  I'm not a thief (thou shalt not steal!), but if there's a way for me to make something as opposed to purchasing it (especially mass-produced items at big-box stores), then I'm all for it.

I'm busy making items for my shop, Punkin Stuffins.  I had a wonderful customer a few weeks ago who purchased nearly all of the pumpkins in my shop, which was great!  But now, I'm low on stock and need to make more items, and with the holidays fast approaching, I'm spending all of my spare time trying to restock.

Enter: primitives.

I've wanted to make some little primitive ornaments for a while now, but wasn't sure how to go about making the "grunge-y" look.  I came across some instructions on eHow, and decided to share my steps with you.  I think that there are several ways to make something look old and grungy, but this is a good starting point for anyone.

You'll need some instant coffee, vanilla extract, cinnamon, nutmeg, ginger, allspice, and water.  You'll also need a sponge brush, a cookie sheet lined with aluminum foil, and an oven set to 170 degrees (because my oven won't go lower than that).

In a glass or other non-staining bowl, put a half cup of instant coffee granules, two teaspoons of vanilla, one teaspoon each of cinnamon, nutmeg and ginger, and two cups of hot water.  Mix together until everything is combined.

Place your fabric on the foil-lined cookie sheets and spread the mixture as lightly or heavily as you want on the fabric, then sprinkle on the allspice and rub it in with your fingers.


Bake at 170 degrees for 10 minutes at a time, checking until they are dry.  If you've stained both sides, you'll want to flip the fabric every 10 minutes.

Once dry, remove them from the oven.  Rub the fabric with your fingers to blend the stain and brush off any excess granules.  You can also use sandpaper to grind down the stain if you've applied a thick layer.

Embellish with embroidery and hand-stitching.  Here's mine!

I think that I'll be adjusting my stain formula because it was too much for what I wanted, but this is a good starting point for anyone interested in making prims.  Just have fun, and enjoy your handiwork!


Wednesday, November 20

Birthday Reflections and a Simple Side Table Mat Pattern


Therefore we do not lose heart, but though our outer man is decaying, yet our inner man is being renewed day by day.  For momentary, light affliction is producing for us an eternal weight of glory far beyond all comparison, while we look not at the things which are seen, but at the things which are not seen; for the things which are seen are temporal, but the things which are not seen are eternal.--2 Cor. 4:16-18

Well, here I am, another year older.  My birthday falls in my favorite season of the year...when I look out the window and see the trees in vibrant colors, with a carpet of fallen leaves covering the ground.  Many trees are a topaz yellow color, with some splashes of ruby, emerald and orange garnet interspersed.  I enjoy the coolness in the air and the smell of fires burning.  I enjoy the cloudy gray days and cool rain, but I also take pleasure in seeing a sapphire sky behind all of the beautiful colors of nature on a clear day.  I anticipate the arrival of winter, when the snow blankets everything in a dazzling display of glittering diamond snowflakes.


There's so much to be thankful for, too.  During this time of the year, we start to turn our thoughts toward Thanksgiving--traditionally a time to give thanks--but it's important to stop and realize just how blessed we really are all of the time.  Every time I come into the house from outside, I think about how glad I am to have a warm cozy house to live in.  I'm thankful for my health, despite the problems I've been having.  I'm so thankful for my wonderful husband and best friend.  I'm grateful that we always have food to eat in the fridge, and the extra income to eat out if we so choose.  I'm blessed to not have to worry about any basic need being filled.  There are many who can't say that.  Mostly, though, I'm thankful for the gift of salvation that I have been given, and the assurance that when I leave this life, I'll be with the One who created me, and there's no greater gift to be thankful for in life.  There's a total peace that comes with that knowledge, and nothing on earth can offer that.

In the midst of all of my reflection, I took the time to start making things with my new fabrics.  I created a simple, yet pretty, set of table mats that I thought I would share with you!  The instructions below are for making two matching mats.

You will need:
4-3" x 13" strips of border fabric
4-3" x 12" strips of border fabric
2-9" x 12" center panel of contrasting fabric
2-16" x 13" coordinating backing fabric (I used the same fabric for the backing and front border)
One spool of matching thread
2-2 1/2 yd. packages of matching piping

Do this:
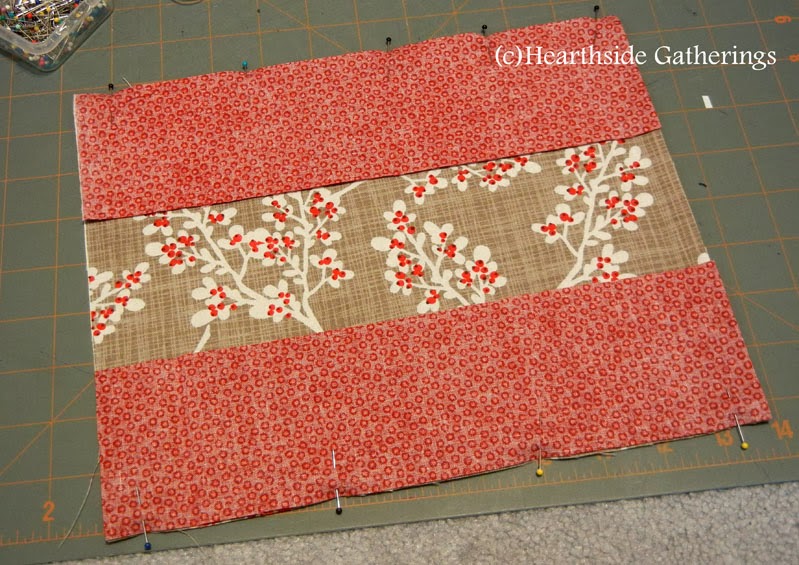
Pin the long sides of the center panel to the long sides of the 3" x 12" strips, right sides together.  Sew these edges using 1/2" seams.  Iron the seams open.

Pin the 3" x 13" strips of fabric to the sides of of the middle panel, right sides together.  Sew these, making sure to keep the seams flat on the sewn piece.  Iron the new seams open.

Cut lengths of piping to slightly larger than each side of the panel.  Pin the piping to the right side of the fabric edge of the top panel.  Line the bottom edge of the piping up to the raw edge of the panel on the right side of the fabric.  Overlap the piping on each corner, and sew along the edge of the piping (usually 3/8").  You can use a special sewing machine foot, but my regular foot worked fine for me.

Pin the backing along three sides of the panel and piping, with the right sides of the fabric together.  Leave the fourth side open for turning out.  Sew along the same line that you created when you sewed on the piping for a guideline.  Iron the edges flat, then turn the last raw edges inward and pin.  Sew along the edge of the piping to close the mat.  Iron the remaining edge flat.


Repeat the steps for your second cover.  You should now have two table mats for your living room end tables!  Great job.  Your overall size should be about 15" x 13".  You can be more creative than me and add batting and quilting, or you can simplify it by leaving out the piping (and skipping a step or two in the instructions).  This is just a basic, simple pattern that you can use as a base for whatever you can create!


Monday, October 28

Busy Weekend!

I spent time up in Michigan with family this weekend.  I had a good time, did some shopping, ate some good food, and went to some great places.  While I was there, I found a delightful quilt shop in Frankenmuth that I'd never visited before, The Front Porch Quilt Shop.  My mom and I decided to stop in, and spent over an hour looking at some gorgeous fabrics.  They had a great selection, and their fall and Christmas fabrics were on sale!  We both left with several pieces of fabric, and I even went back on Saturday before we came home to get a few more pieces.  I have grand plans for all of this beautiful and festive fabric!

As of last Friday, there are officially two months until Christmas.  This time of the year always goes by so quickly!  Thankfully, I didn't have any housework that needed to be done on Sunday, so while the hubs watched football, I got Christmas crafty.  I spent all day making these adorable little snowman & tree sets that are available to purchase on Etsy.  They turned out just as I had pictured them, and I'm very happy with them.  I think I'll keep one set of each color for myself.  If they sell well, I'll make more!
You can visit my Etsy stores here:
The Sunflower Tree
Punkin Stuffins
I'll be adding new Christmas items soon!

Did you know that I started a new blog?  I am making recipes from an antique 1845 cookbook that I own, and revising them to today's recipe standards.  It's a lot of fun.  I'd love for you to stop by and check it out: The Colonial Cook!

Sunday, September 22

A Fun Ornament Project

Last weekend I was in a crafty mood.  I've actually been working on some of the projects in my craft room, and am happy to say that I'll be crossing three off of the list.  Three off of the list means that there's room for three new projects, right?

So, of course, I started something new.

I went to Michael's in search of wooden laser-cut ornaments and glitter.  I have lots of glitter, but I really love the Recollections brand of glitter that I can only find at Michael's, which is located about forty minutes away (they have some of the most vibrant colors in glitter that I have ever found).  But it was okay, because I was itching to go for a ride.
We had a fun time in the big city, going to Michael's, Bass Pro (for my hubby to regain his manliness after wandering around with me in a craft store), Chick-Fil-A, and Chili's (Chili's has a delicious new margherita flatbread dish, which I recommend, but I don't recommend the pesto ranch sauce that comes with it).  I came home with exactly what I had been looking for: eight laser-cut unfinished wood Christmas ornaments and MORE GLITTER! 

**Just an FYI--you should be able to get the die cut ornaments at most local chain craft stores: JoAnn, Hobby Lobby, Michael's, etc. for around $2 each.**

It's a really simple project--just paint on the glue with a paintbrush and apply the colors one at a time.  The different colors of glitter won't stick to each other unless the glue is still wet.  Spray them with clear sealer once they're done, and you have a simple project with a huge WOW factor!  String jute rope or pretty ribbon through the top to create a hanging ornament.

Here's what I have so far:

I used two shades of blue on these trees.


These are going to look GREAT on the Christmas tree in a few months.  It might take me that long to get the rest of the die cuts glittered.  I hope I've inspired you!

Thursday, July 25

More Than I Can Chew

Update: Thanks to Adorned From Above for featuring this post in their blog hop (#62)!

Yes, I've bitten off more than I can chew.  I do it often.  I'm sure I'm not the only one.  Please, please tell me I'm not the only one.

The problem is that my brain works a lot faster than my body.  I'm not an old hen, but I'm also not a spring chicken, either.  My mind comes up with all kinds of ideas that my body just can't keep up with.

Here is one project that has yet to be touched:  a simple mantle runner.  Just one yard of homespun fabric.  All I have to do is cut it in half lengthwise and sew it all closed.  It would take me about 20 minutes to make.  No batting, no quilting, nothing that is even remotely complicated.  But it's not done.  It's just staring at me, laughing.
Another project: produce bags for grocery shopping.  I thought it would be a great idea to get some mesh fabric and make some produce bags for the store, instead of using the plastic bags on the little wire racks.  Again, this is a 20 minute project, maybe 30 tops.  I bought the fabric, and there it sits.
My sleigh bells.  While I sent out the large set to be finished professionally, I did some research on my own about refinishing bells and purchased these two small straps at the antique store.  Then I went out and bought everything I would need to clean and refinish the bells, including professionally-made replacement straps.  I had planned on working on these while my hubby was gone on a trip.  He's been on several trips since I got all of these supplies...so why haven't I gotten around to this?
Here is my fabric for making a new dress for the McKinnis house.  I have the design drawn, but this is a fairly complicated project; it will take a while from the time I draw out the pattern to the last hand stitches in the hemline.  This project, I give myself a bit of leeway on, due to the complexity.  But I've been planning on starting it for about a year now.  Not a whole lot of room for much more leniency.
My husband's scarf.  Pretty self-explanatory.
My work bag.  So many little sewing project in there that I can't keep up.
Here's a piece of Roseville pottery that my neighbor kindly gave to me.  It just needs some cleaning up--a soak in soapy water and maybe a little scrubbing with a toothbrush.  Still not done.
Honestly, this list is just the tip of the iceberg.  I have a bunch of ideas in my head still.  I am also working hard on new items for my Etsy stores (I opened up a second shop just because I was getting too wide of a selection of items in my first one) and am trying to prepare for the upcoming holiday sales.  Right now, I'm concentrating on fall, but it takes up a lot of time.  I spend my evenings on the couch with the hubs, working away, putting all other projects aside.  Whether it'll turn out to be worth it, we'll just have to wait and see.  I'm looking forward to some down time...but I don't think it's coming!

What are you working (or not working) on?


Sunday, March 31

Happy Easter!

Romans 6:8-11: "Now if we died with Christ, we believe that we will also live with him. For we know that since Christ was raised from the dead, he cannot die again; death no longer has mastery over him. The death he died, he died to sin once for all; but the life he lives, he lives to God. In the same way, count yourselves dead to sin but alive to God in Christ Jesus."

Happy Easter!  I hope everyone has had a great day.  I had a nice, relaxing long weekend with my husband, who didn't have to work on Good Friday.  It's a nice little bonus holiday for him.


Tomato Seedling Update
Well, I lost my patients.  All but one of the tomato transplants have withered and died.  I was so sad when I saw them the next morning...one of the plants was doing well until a few days ago, when it too began to wilt, and there was no recovering it.  One plant remains, and it's better than none, but I had hoped for a better outcome.  Lesson learned, sadly.

There is still hope for the tomatoes.  Click on this post to see what happenedTomato Seedling Surgery 2.0


Gluten-Free...For Now?
I have had quite an eventful week this past week.  After a month of having strange stomach and intestinal problems, I visited my doctor, who thinks I have a gluten allergy.  Not the greatest news for one who lives for gluten-based foods like pizza, pasta, breads, cereals, cakes and cookies.  I have been ordered to remove any gluten from my eating choices for a month, and then return for a check-up.  I haven't had stomach problems up to this point, so I'm hoping that the diagnosis is not accurate.  Honestly, I have really struggled with this, because that completely destroys all of my meal planning for the month.  I have no idea what to make for meals now.  I don't have the time or interest to make every single meal from scratch...I, as most people do, depend a lot on convenient pre-packaged grocery items to help me with cooking.  I spent $56 on baking and cooking substitutions of rice flour, gluten-free all-purpose baking mix, gluten-free bread crumbs, gluten-free quick oats, and a few other things.  Gluten-free items are very expensive.  Should it be determined that I'm allergic to wheat, or that I have celiac's disease, I'm  honestly not sure how I will afford the new grocery bills.  It's a huge adjustment in lifestyle, and one that I really don't want to make unless I absolutely have to.  I'm sure that I'll post more about this at a later time.  For now, I ask for prayer, that God will heal me and my life won't have to drastically change.  It's not just my life that will change; my husband will be affected, too.  It's difficult to know that you will suddenly become a burden or annoyance to others.  I know that those who love and care about me will be understanding, but those people are few, and the world is a huge, unaccommodating place.

If you are interested in more information, visit this page: Non-Celiac Gluten Sensitivity

For some gluten-free recipes, visit my Pinterest board: Gluten-Free.  I have tried the pizza crust recipe posted there (not terrible), and I hope to try more of these these recipes soon!
Another Project
Hubby and I spent Friday and Saturday having fun together.  While we were out on Friday, we went to the local antique shop to look for something specific.  However, I walked out with another set of sleigh bells!  Oops, I just can't help it.  These are smaller bells than the last set I purchased, but I will be restoring these myself.  I sent the last set away to be restored, but I feel confident enough now to want to try this on my own.  These bells are quite a bit smaller than the others, only about 2" wide, and will make a nice small decorative strap in the future.  I'll post the process on here when I have time to start working on them.


Happy Easter...He is Risen!!

Sunday, March 10

Spring Wreath, Inspired by Pinterest


"For ground that drinks the rain which often falls on it and brings forth vegetation useful to those for whose sake it is also tilled, receives a blessing from God." Hebrews 6:7, NASB

Today is a beautiful Sunday!  I have spring fever, for sure.  The temp is in the 60s, and I have some windows open for the first time in 2013.  I'm listening to a new CD by one of my favorite musicians, and felt like being a little crafty.  I saw a pin on Pinterest a while ago and have wanted to make it for spring decorating, and today seemed like the perfect lazy Sunday to do so.  It's really easy to do, and you can even make it while you are watching your favorite program on TV.  You can also customize it to fit the season, if you use a little imagination.  Let's get started!

Supplies
  • One 12" green foam wreath form
  • One skein of Yarn Bee brand haute fur, cypress color, 76 yards (I found it at Hobby Lobby)
  • One roll of 1 1/2" wide by 9' wired satin ribbon, your choice (you could go a little wider, too)
  • One yard of 7/8" daisy ribbon trim (I couldn't find rolls of it, but I found it for sale by the yard at JoAnn crafts)
  • One package of 1 1/2" long pearlized pins, your choice of color heads
  • Fray check (not pictured)


Step One: Wrapping the yarn
Start wrapping the yard around the form by holding a short length of the yarn with your thumb, while bringing the yarn over the piece you are holding with your thumb.  Wrapping the yarn over the piece you hold with your thumb will hold the loose end in place as you continue around the wreath form.
Try to wrap this part tightly and keep the strings close together.  Once you have the beginning piece completely covered, you can start going faster, wrapping the strands more loosely and then pushing them together.
 
Continue in this fashion until you've covered the entire form.  It'll probably take about an hour.  I listened to/watched two episodes of Good Eats while I worked on this.

Step Two: Securing the end of the yarn
When you finally get to the end of the wreath, pat yourself on the back.  Then leave about 8"-10" of string attached after you cut the end.
Take out a pin, and tie the end of the yarn around your finger.  Not tightly, and not in a knot.
Take the loop off of your finger, but don't tighten it yet.  Take the pin and insert it through the loop you made on your finger.  Tighten it around the top of the pin, underneath the pin head.  Then wrap the remaining little end of string around the rest of the pin, wrap the length of string around the wreath form.  Insert the pin into the foam to hold the end in place permanently.
 
Now your wreath should look like this!


Step Three: The bow and hanging ribbon
Cut a piece of ribbon about 2 1/2' long for the bow.  Then cut another length of ribbon for hanging; this length depends on how long you want the wreath to hang down.  I cut my length at about 3', but then shortened it quite a bit later.  Wrap the 2 1/2' length of ribbon around the same spot that you pinned the end of the yarn, and tie it once loosely.  Now, take the hanging ribbon and thread it through the bow ribbon.

Now, tighten the bow ribbon, and tie a knot.  This will secure the ribbon.  Then tie the bow.  Remember when  you were first learning how to tie your shoes, with bunny ears?  I've found that to be an easy way to get a decent-looking bow that stays fairly straight and neat.  That's the method I used to make my bow.
We'll trim and treat the edges of the ribbons later.

Step Four: The flowers
Now we need to separate the flowers.  Cut each apart and set them in a cute little pile.
Arrange the flowers on the wreath before you pin them in place.  Once you have them where you want, pin away!  Put as many on as you like.
 

Step Five: Trim the ribbon ends and treat them
Cut the ends of the ribbon, either by angling them or cutting them in a wedge.  Spread a thin layer of Fray Check along the cut edges.  Tie the hanging ribbon to your desired length and cut an angle along the edges of those ribbons.  Treat these ends with Fray Check as well.

Step Six: Hang and enjoy!


All told, I used a bunch of coupons between Hobby Lobby and JoAnn Fabrics, and the total of all of the materials came to around $20.  Not bad, I thought!

ShareThis