Showing posts with label Gardening. Show all posts

Tuesday, September 25

Drying and Saving Herbs, Part 2

A while ago, I posted about how to prep your fresh garden herbs for drying.  This is the second part of that post--what to do when the herbs are dried out.  It's super easy!

Once your herbs are dry and crunchy, like this, they are ready to be ground up!


You'll want to get some supplies: bowl, herb scissors, a stem stripper, and an herb grinder (all pictured) or mortar and pestle, funnel, and glass jars.  The one pictured was a gift from my mother-in-law that she found from Pampered Chef, but you can also find them on Amazon.

Once the herb leaves are crunchy and dry, you'll want to remove them from their stems using an herb stripper tool.  Parsley is easiest, because the leaves are just at the top of the stems.  If you don't have a stripper tool, you can just pick the leaves off by hand or strip the stems by running your finger and thumb down the stem (for woody herbs).

Remove the leaves and keep them together.  I put them in a bowl as I'm plucking.  Once you have enough to run them through your grinder of choice, go ahead and do so!


Once the leaves are ground, I keep them in a labeled glass jar.  I just keep adding to the jar as I continue to dry herbs all summer.

Voila!  You have just made your own dried herbs!  And you know exactly where they came from and how they were grown.  Another bonus is that they are fresh, and the smell and taste so much better than the bottles you buy at the store!  

Tuesday, July 10

Drying and Saving Herbs, Part 1

In between trips to Michigan, I tend to my 5,000 square foot garden.  It's one of my passions, and lately, a huge stress reliever.  I returned home last week to a garden bursting with fresh herbs; a nice surprise, to be sure!  The herbs have been doing well so far this year.  It's been great!  It's funny, though, I rarely think to go out to the garden and get fresh herbs for cooking.  I'd love to use fresh basil in Italian dishes, if only I could eat Italian food!  I'd make myself a tomato, basil, and mozzarella pizza...add fresh basil to chicken pasta...throw basil into spaghetti sauce...but alas, it's not to be right now.  I'm focusing on the next best thing, though: drying fresh herbs!  Think about how often you use oregano, thyme, sage, parsley, et cetera for your cooking every day.  Now, think of how awesome it would be to have a whole jar full whenever you need it, and think of how great it would be to know exactly where those dried herbs came from.  If I can do this, YOU can do this!  It's so easy.  I'll show you just how easy it is!  Follow me!

So, here's what you'll need:

Twine
Sharp scissors (these are the special herb-cutting scissors I use, click here for a link, and no, I don't get any money for the link)
Herbs cut from your garden or patio pots
Ornament hooks or clothes pins

First things first: cut your herbs.  Try to do it when there isn't much dew on the plants.

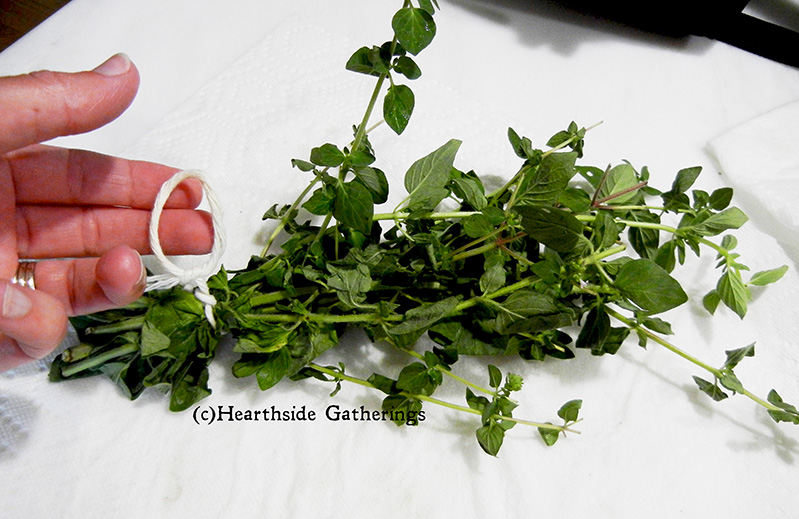
Next, bring them inside.  Here I have three kinds of herbs: flat-leaf parsley, oregano, and basil.
Freshly cut from the garden.

Work with one type of herb at a time.  Check each stem for bugs.  Trust me.  I found a snail and a green worm in my herbs.  Remove said bugs by whatever means pleases you.

Arrange in bundles of about the same length.  Rinse with water to remove dirt.  Place on a cloth or paper towel in a single layer and pat dry as best you can.
Oregano--these were really tall, so I cut them in half before washing and bundling them.

Pat excess water with towels, as best you can.  They won't be completely dry.
Bundle and tie with a long piece of twine.  Be sure to tie tightly, because as the herbs dry, they will shrink.  Do not bundle too many sprigs together--it'll take longer to dry out if the bundle is too large.  Tie a hanging loop on one end of the twine.

Lather, rinse, repeat (metaphorically speaking), until all herbs have been washed, patted dry, and tied together.


All tied up and ready to be dried
Find a good place to hang your herbs.  I hang mine in the basement on the same shelves that I use to start my seedlings, near a dehumidifier, but you could hang them in a barn or garage, someplace airy but not too dusty. Hang them with plenty of space for air to circulate around them and allow them to dry.


Leave them be for a month or two.  No need to do anything to them.  I've seen that there are some people who have success drying herbs in their ovens, but I haven't tried that...yet.

Once they are dry, you'll crush them.  We'll cover that in part 2...click here!

Tuesday, June 19

It's Been a While!

Wow, where to start?  I've been off of here for quite a while.  So much has happened.  Things that I want to talk about, and things that I don't want to talk about.  I've lost a parent, quit my job, my health issues have gotten worse, and my dog has a rare disease.  I've started my garden again this year, started and transplanted my seedlings, and continue to work on finishing a room in the basement that I'm confident will, one day, be a studio/craft room.  I'm working on opening a new shop on Etsy, but in light of all that's been going on, it's on the back burner right now. 

Herb bed on the left, asparagus bed on the right
My main goal with the garden this year is preservation!  My garden last year was experimental.  I tried several types of plants to see what grew well and what struggled.  Here in northwest Ohio, we have very clay-ey soil.  I wanted to know what could grow without amending the soil at all--it was once farmland--and I learned a lot.  I learned that tomatoes and green beans grow well here (but I believe they grow well anywhere!).  I learned that growing a sweet corn variety next to an Indian corn variety will result in cross-pollination and some seriously unappetizing corn.  Haha, once my hubby found out how I planted the corn, he found it hilarious, because he would have told me not to do it!  I learned that there was no need for more than one plant each of zucchini, yellow squash, and winter squashes, although my abundance of winter squash kept very well in the basement for most of the winter.  I learned that potato plants should be planted in a different area of the garden on account of how wet certain areas of the garden become after heavy rains.  I had great success with carrots last year!  A five-gallon pail was overflowing with the harvest.  I processed and froze them in slices. 
A rainbow of carrot varieties

Sugar Baby Watermelon
Melons seemed to like the growing environment, and I ate some of the sweetest cantaloupe I've ever had from the garden.  I learned that garlic just doesn't like my soil.  Vidalia onions seemed to do well, even though I don't like to eat onions.  Home-grown strawberries are delicious, but hard to maintain and keep de-weeded, and when it's time to replant the patch, there will be a raised bed with weed block underneath.  I started an herb garden directly in the soil last year, but moved everything to a raised bed after the herbs struggled to get established in the clay.  I've tried to start a lavender patch, and some lavender came back and some didn't.  This year, we started an asparagus patch that should yield a harvest, even if only a light harvest, next year.  I dried and preserved herbs at the end of last year, and plan to dry and preserve much more this year (more about that in another post).  I dealt with insect issues and other plant diseases.  I fought a losing battle with weeds that continues this year.  So I say all of that to say that this year, I've planted an abundance of tomatoes, herbs, green beans, potatoes, corn, and melons, with the plan of preserving as much as I can this summer and fall.
Strawberry, before the weeds invaded
Herbs drying on a rack in the basement


I love the education that this garden has provided.  Having a large garden space has been a dream of mine for years.  Thankfully now, I have it and can continue to learn.  And maybe even pass a few tips along to others who read this! :)

Sunday, February 7

Seed Catalogs

We have internet this weekend (long story--still don't have a provider for internet or cable), so I wanted to post about my current obsession:

Seed catalogs.  Every gardener gets them each winter.  Every photo of every vegetable, fruit, flower, and herb looks incredible, and conjures images of warm summer sunshine, eating at a picnic table, working the dirt...it's like an escape from the gray, dreary landscape of winter.  At least, it is for me!


This is my first year of requesting and receiving seed catalogs on a large scale.  This is also the first
year that we are planning out our new, much larger garden and establishing perennial beds that will provide for years to come.  I can't tell you how excited I am to be able to really plan, not just imagine or daydream about this, and with the warm-ish winter we've had in northwest Ohio, it's even harder to wait for spring.  There have only been two snows this year to date--although I realize it's only the first part of February, so there are bound to be some more snow before all is said and done.  But I digress.

I've placed and received one order for seeds from Botanical Interests, and just placed a second order for more seeds from High Mowing Seeds.  I chose these two companies for several reasons: they offer a large selection of organic and heirloom seeds, they are both part of the safe seed pledge, they each had some really unique plants that I hadn't seen before, and very importantly, they both offered free shipping.  Plus, I absolutely love the packages of seed from Botanical Interests--an artist draws each plant for the packet, and they are just beautiful; I think I'll keep the packets to display after planting!  I still have more plants and seeds to purchase, but the rest can be found locally, so I think I'm done with mail orders.

Aren't these beautiful?  I love the illustrations!
My growing space will be in our basement, which stays relatively warm, but probably not quite warm enough for seedlings, and definitely not enough light for small plants.  Because of this, I've purchased seedling heat mats, plastic pellet greenhouses, a shoplight that will shine growing fluorescent lights, and seedling potting soil.  I also purchased a little metal greenhouse rack that was brand-new in the box from a rummage sale a few years ago, and finally have the chance to use it for my seedlings.
So, I'm ready to go!  All we need is some warmer weather.   Are you starting to plan for your garden yet?  Comment below!

Tuesday, July 1

The Garden Bed

Now that our front porch is finished, my husband and I have been hard at work, taking a weekend to work on our new garden.  We have spent long hours in the hot summer sunshine, enjoying the outdoors and each other's company.  We really do work well together!  We leveled the dirt, built a retaining wall, filled it with two loads of dirt, planted grass seed, placed a line of plain stepping stones along the edge of the driveway, and planted several plants.  Although it's not completely finished, we are so happy with it so far!


We've planted larkspur:

Sedum, which was a transplant from another area in our yard--one plant became three:
Columbine, also transplanted from another spot in the yard:

Little Grapette daylilies (not yet bloomed):

Photo from the internet
A mum, next to the larkspur, from another spot in the yard:

These beautiful calla lilies:


Pale pink balloon flowers:


This plant, called Scarlet O'Hara Catchfly, with bright reddish-orange blooms:


And my favorite, two beautiful pale yellow rose bushes, called Yellow Brick Road:

We'll still add more plants and put a layer of mulch down once all of the plants are placed.  It's been a lot of hard work and sweat, but it's been so gratifying to be able to take time off together and do this project.  We've gotten several compliments from passers-by, and we are so excited to see everything grow and bloom through the summer.  Time well spent!

Saturday, May 10

Let's Get Dirty!

"Now he who plants and he who waters are one; but each will receive his own reward according to his own labor. For we are God’s fellow workers; you are God’s field, God’s building."--1 Cor. 3:8-9

Last weekend my hubby and I worked on our yard.  The weather is so nice right now!  I'm doing all I can to enjoy it and soak it up.  I'm looking forward to the warm summer months ahead, and I'm enjoying all of the green that's been appearing over the past few weeks.

We are planning to have the cap on our front porch re-poured sometime this summer.  As a result, some plants needed to be moved.  We also have a bed of shady plants that becomes overgrown with weeds every summer, regardless of the weed block under the mulch and the weed killer that we spray, so I had an idea to move them to a better location and just cover that bed completely with mulch.  Then, we'll keep up the weed spray, and hopefully keep it looking nice!  It's a north bed that remains in constant shade and stays pretty damp, so it'll be a never-ending battle, but at least we won't have to be careful of the plants now.
We moved those plants to a bare area that used to contain an large round evergreen bush.  Our neighbor was kind enough to cut the bush down last summer, just leaving the stump.  However, the ground was bare underneath from years of growth, so I transplanted four day lilies, four bell flowers (which I split from one large plant), and two little tiger lily bulbs to that space, and lined it with paver brick that we already had.  No cost, just a little elbow grease, and we'll have a gorgeous space with orange and purple flowers this summer!  At least, I hope they bloom this summer.
I also transplanted several hostas and a sedum plant that split in two when I dug it up.  The hostas are now against the house, and the main problem will be to keep them watered, because they are under the eave and that area tends to stay pretty dry.  The sedum doesn't have a home right now, and will just have to hang out in pots, along with the columbines that I had to dig up in front of our porch. 
It was a lot of work, but the day was beautiful, and I always love doing projects around the house with my husband.  We make a great team!

ShareThis