Sunday, September 30

Saturday Fun--Pumpkins and Sleigh Bells. What?!?

Saturday was a fun day.  Hubby and I spent the day together, which is my favorite way to spend the day.  We started out our adventures by heading to the local pumpkin farm.  I purchased four pie pumpkins, which I will puree and freeze for later, then I purchased an arrangement of broom corn, some mini pumpkins, a medium-sized white pumpkin, and something called an apple gourd.  We'd never seen the apple gourds before, so I was intrigued.  It's green, and shaped like a giant apple, hence the name.  We walked around the pumpkin yard, visited a tom turkey in a cage (for a funny turkey song by comedian Heywood Banks, click here--no worries, perfectly family-friendly), and petted a girl's pet kitten.  It was a good time.  We plan on going back for a Christmas tree in a few months, when they go from selling fall items to Christmas items.  On a side note, I always thought it would be fun to have a Christmas tree farm!  In my head, it would be awesome.  There would be snow, of course, because people like snow and picturesque Norman Rockwell-type memories.  There would be horses and sleigh rides, and hot cocoa, and nice customers, and just all-around fun.  I have a friend whose parents have a tree farm in southern Indiana, and I enjoy reading about their fun times during the Christmas season.  Anyway, we enjoy having a live Christmas tree and the fragrance of fresh pine.  I'm looking forward to it already!
I love the simple elegance of a white pumpkin.

Apple gourd--isn't it neat?

Small pumpkins drying before being placed about the house.

Two of my four pie pumpkins.  They are good sized--hopefully I'll get a lot of seeds to roast and pumpkin to freeze!
Speaking of sleighs and horses, our next destination was the local antiques store just north of town.  (I know, weird transition.  Just stay with me here.)  I was on a mission for two things: a one cent coin from 1847 and a set of antique sleigh bells.  Earlier this week, while perusing Etsy and Ebay for other reasons, I came across both and decided that my life would not be complete without either item.  The sleigh bells, I wanted for Christmas decorating (more on that below), and the coin, for the living history programs that I volunteer for at the McKinnis House.  I thought the coin would be a neat conversation piece, as in "my husband gave me an allowance this week".  I plan to investigate just how much that coin would buy a hundred and sixty-five years ago (I just looked it up; it is the equivalent of a quarter today.  Still wouldn't buy much--maybe just a newspaper).  After walking around the antiques store for a few hours, I finally found both!  This is a large antique store, the kind where dealers can rent booth space, so there are well over two hundred booths/vendors that comprise the store.  In the whole place, I found a total of three sleigh bell straps, and two were in terrible condition.  The third was priced a bit higher than I wanted to pay, but was exactly what I had in mind, so we were able to haggle the price down to something more affordable.  The coin, while not exactly common, is also not exactly rare, but I was able to find a coin in good condition for a decent price.  I left there feeling like I had struck gold, so happy was I with my purchases!  It was already Christmas for me.


For the sleigh bells, I plan on hopefully being able to preserve and restore the leather strap on which the bells are mounted.  I will contact the local tack stores to see what they might recommend.  However, if anyone has any suggestions about restoring old leather, please feel free to leave a comment at the end of this post.  I will be sure to post what I find out as well.  I considered trying to shine up the old bells too, but after considering it more, I have come to the conclusion that I like the patina on them too much to do anything.  Once I get the leather back to good condition, I plan on mounting the whole strap onto some greenery and adding a bow or some type of festive decoration, and possibly hanging it on the side of the front door that faces into the living room.  I am also considering hanging it on the wall next to where the tree will be, but that would require having something to hang it on, like a nail, and I don't want to put holes into the wall.  Removable 3M hangers might be an option, though.  Oh, I'm so excited!!


If you have an interest in sleigh bells, and don't know much about them, I suggest checking out this website: Classic Bells.  With the information on that site, you'll know what you're looking at in no time! 


After that, we had pizza, and it was gooooood.  We made a few more stops, then headed home.  As I said before, I love having Saturdays with my bestest bud, where we have no place to be, nothing to do, and can just go at our leisure.  Plus, the weather was gorgeous--seventy degrees and bright blue skies.  What a great day! 

What are some of your favorite things to do with your husband?  Keep it PG-rated!!  :-)

One thing I like to think about regularly is the Garden of Eden.  The Bible says that God created the heavens and earth, land and seas, plants and trees, the sun and moon, fish and birds, cattle and beasts of the earth, and finally man and woman (Genesis 1-2).  All this in the span of a week!  My weeks are never that productive, no matter how hard I try to get things done.  Anyway, for man and woman to live in, God created the Garden of Eden, and from Biblical accounts, it was a spectacular place to dwell.  Not only was it perfect, but it was beautiful, lush, and probably unlike anything we see now (or will ever see) on earth.  I wonder what it might have looked like.  I wonder if there were plants and animals there that were never seen again once Adam and Eve were cast out.  I wonder if there were colors in there that we know nothing of today.  In short, I wonder if it was a literal heaven on earth.  Even on perfect, beautiful days like Saturday, I know that it's nothing compared to what we have to look forward to in eternity with our Heavenly Father one day.  Something to always look forward to!  


Tuesday, September 25

Apple "Donut" Muffins...Totally Worth the Effort!

I have a confession.  I...am...a... ... ... Pinterest addict.  There, I've said it, and now I feel better.  In fact, I feel another confession coming on: I...am...also...a huuuuuge...fan of apple cinnamon.  And fall.  And apple cider donuts.  And hot apple cider.  Oh my gosh, I think I've opened up the floodgates!  Save it for the support group, Andrea.  Ahem.  So, because of my Pinterest addiction, I found an intriguing recipe called "Baked Apple Cider Donut Holes" from a website called Feastie (check out the page here).  It was a kind of gloomy, rainy day here in my neck of suburbia, and I had planned on making a pot pie for dinner, but was compelled after my day at work to make these little baked muffins for dessert.  It just seemed fitting.  So while the pie was baking, I whipped up a batch.  The recipe follows at the bottom.

First, I mixed flour, baking powder, baking soda, salt and cinnamon in a large bowl:
Next, I mixed together an egg, brown sugar, apple butter (my mother-in-law's recipe for homemade apple butter with a secret ingredient), vanilla extract, honey, apple cider, plain yogurt, and canola oil.  I know, it looks disgusting:
Once all of the ingredients are whisked together and blended well, pour the wet ingredients into the flour mixture, and whisk to just moisten everything:

Action shot!
Then, drop by teaspoonful into well-greased mini muffin tin, being careful to only fill about halfway or two-thirds full:
Then bake at 400 degrees for about 10 minutes.  Serve with a delicious dinner:
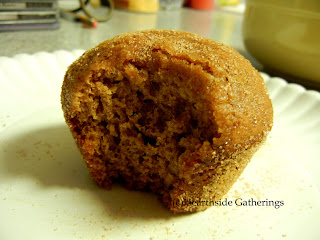
Allow the muffins to cool a bit.  After they've cooled, roll the sides and top in a sugar/cinnamon mixture:
And then devour:
We go all out by breaking out the fancy paper plates.

I actually ended up with a full 24-mini muffin tin and ten regular-sized muffins.  These were a hit with both me and the hubs.  I was actually thinking as I ate the muffins that this recipe would make a delicious cake!
Our rainy evening
A beautiful sunrise last week.  The only thing I did to this photo was add the copyright at the bottom.
Recipe for Baked Apple Cider Donut Holes, from Pinterest and Feastie.com:
2 C flour
1 1/2 tsp baking powder
1 1/2 tsp baking soda
1/2 tsp salt
2(ish) teaspoons cinnamon (I used heaping teaspoons, and added an extra half teaspoon)
1 large egg
2/3 c lightly packed brown sugar
1/2 C apple butter
1 tsp vanilla extract
1/3 C honey
1/3 C apple cider
1/3 C plain yogurt
2 tbsp canola oil
cooking spray
2 tbsp unsalted butter, melted (this is optional)
1/4 C sugar
1 tbsp cinnamon

Preheat the oven to 400 degrees.  Spray a mini muffin tin with non-stick cooking spray (I use Baker's Joy or Pillsbury Baking Spray-they have flour in them).  In a large bowl, combine the flour, baking powder, baking soda, salt and cinnamon.  Set aside.  In a medium bowl, mix together the egg, brown sugar, apple butter, vanilla, honey, apple cider, yogurt and canola oil.  Whisk until well mixed.  Pour the liquid ingredients into the dry ingredients, and whisk until just moistened.  Be careful to not over-mix.  Drop by teaspoon into the mini muffin tray, filling each about halfway to two-thirds full.  Bake for about 10 minutes.  Allow to cool.

In a small bowl, mix the 1/4 C sugar and 1 tbsp cinnamon together.  Remove the muffins, and brush the tops lightly with the melted butter, then dip the top and coat the sides of the muffins with the cinnamon sugar.  The butter is optional, really--the cinnamon sugar will stick to the muffins on its own.

These are not hard to make--don't let the long list of ingredients scare you.  Chances are, you have most of the ingredients in your pantry and fridge already.  They really are easy, and super-delicious!  Well worth the effort...your family will thank you for the treat!


Monday, September 24

Fall Photos and Northern Pygmy Owls

Aah, finally...a nice, cool fall weekend!  I've been waiting for this for a while.  It was sixty-six degrees in the house when we woke up yesterday morning, which was nice but a bit chilly for me, so I had a great excuse to turn on our heater in the living room.  It's been a quiet weekend.  We are happy for it, since hubby was traveling for work the past two weeks.  We just spent time together and relaxed.  I made venison stew and another batch of monster cookies.  I have a recipe for apple spice "donut holes", which are actually baked in the oven in mini muffin tins, but haven't made them yet.  I'll be sure to share the recipe if they turn out to be good!  Since I don't have much to report, I'll just share some random 2011 fall photos from my collection with you.  I hope that the colors will be good again this year, but the drought might have had an effect on that.  Anyway, enjoy!
Gourds in the Garden

Entrance to Litzenberg Park

Great fall colors

Litzenberg Barn

Vibrant

McKinnis Homestead

Leaf.  Silly!
The fall season usually triggers thoughts of cool weather, leaves changing, the smell of burning wood, and owls.  So without further ado...

The Owl Corner
Northern Pygmy Owls
Photo by Paul Higgins, found on utahbirds.org.
These cute little owls are found in the western United States and north into western Canada.  They are distinguished by special markings on their neck and tail: on the back of their neck, there are two black spots that resemble a second set of eyes, and on the tail, there are thin horizontal white stripes.  They also have small spots all over their brown or reddish-brown back feathers.  These owls are most active at dawn and dusk, and prey ranges from small songbirds to rodents and insects, and some amphibians like toads and frogs.  They are small in size, averaging about 7" tall, but they can carry prey up to three times their size.  They typically bring the prey back to the nest, and will store prey in cavities inside trees for the winter.  They also store food in the summer, but in relatively small amounts, because prey is more abundant in the warm weather.  They typically only have one mate for life, and lay a typical clutch of three to four eggs.  Scientists are still collecting information on this species.

Information taken from owling.com, utahbirds.com, birdweb.org, and owlpages.com.

Almost every day of our lives, we will encounter those who seem to have no morals or dignity.  It could be on t.v., or in person, or through contact online.  We as Christians are held to a higher moral standard in this life than those who are not believers.  So how do we handle it?  The Bible outlines several ways to deal with these encounters, and I personally like the instruction given to us in Psalm 37: "Do not fret because of evildoers, be not envious toward wrongdoers. For they will wither quickly like the grass and fade like the green herb. Trust in the Lord and do good; dwell in the land and cultivate faithfulness. Delight yourself in the Lord; and He will give you the desires of your heart. Commit your way to the Lord, trust also in Him, and He will do it. He will bring forth your righteousness as the light and your judgment as the noonday. Rest in the Lord and wait patiently for Him; do not fret because of him who prospers in his way, because of the man who carries out wicked schemes. Cease from anger and forsake wrath; do not fret; it leads only to evildoing. For evildoers will be cut off, but those who wait for the Lord, they will inherit the land. Yet a little while and the wicked man will be no more; and you will look carefully for his place and he will not be there. But the humble will inherit the land and will delight themselves in abundant prosperity." (Psalm 37:1-11)  God knows and God sees what happens to us.  He may allow certain things to take place that are unpleasant or uncomfortable at the time, but they are meant to make us into the children that He asks us to become.

Saturday, September 15

DIY Winter Decor--PS, It Has Sparkles!

I had an idea for a sparkly decoration for my wall to brighten up the cold winter days.  I could see it all in my head: the glitter, the letters, the snowflakes...so I took myself down to the local Hobby Lobby, purchased the bulk of my supplies, and set to work on my idea.  It turned out well, so I decided to share it with everyone!  It took a few days to make, because of drying time, but I think it's well worth it.  And, it wasn't that expensive, because I like to buy things that are on sale or that I can use coupons on.  So, without further ado, here's my project!

First, assemble your supplies.  In this picture, I purchased the wooden plaque, high-gloss acrylic spray, foam brushes, 1/2" thick x 3 1/2" tall chipboard letters, wooden cutout snowflakes, and clear plastic jewelry line.  I already had the different colors of glitter, all-purpose glue, wood glue, and paints.  I am missing the letter "T" and the picture hanging bracket in this photo.
I did this project in my living room.  Regardless of where you do this project, it will be a good idea to spread newspaper or a protective covering of some sort on the surface where you will be working.
The first thing I did was start painting the wooden plaque.  I used a white pearl paint, but it was somewhat see-through and would end up requiring several coats.  If you use a pearlized paint, you might want to apply a base coat of a solid color that matches your pearl paint.  It will cover much better.
Next, begin adding glitter to the letters.  Pour some all-purpose glue into a container, and using the small foam brush, and brush it on the letters like paint.  A thin coat will do just fine.  I started with the faces of the letters.
Then, sprinkle on the glitter.  Good thing hubs wasn't home for this step.  The glitter goes everywhere, and he HATES it.  I just laugh.

I did all the letters like this, making sure that I didn't have any bare spots on the letters.  I let the glue/glitter dry overnight.  Then I came back and started applying the glitter to the sides of the letters (try to keep glue and glitter from seeping onto the back of the letters).
Once all of the front and sides of the letters are glittered up, and your plaque is painted to your liking, it's time to attach your hanging hardware.  I decided to purchase a large metal hanger with pegs and teeth.  It sounds vicious, but it's really quite nice!  Check it out:


To attach these, simply measure out the middle of where you want to attach it, then gently tap each bracket side into the wood with a hammer.  Super easy!

Okay, now you are ready to attach your letters and strings for the snowflakes.  Cut your desired number of pieces of the plastic string to your desired length (I decided to just add three snowflakes) and wipe off the plaque to make sure it's free of debris (or in my case, glitter).  Begin to apply wood glue to the backs of the letters.  I'll demonstrate the wrong way:
You will want to add the clear string to the glue on the back of the letters before attaching the letters to the wood.
 
As you can see, leaving thick blobs of glue on the back of the letter will result in oozing glue when you apply pressure to the letter to attach it to the wood.  I forgot that when I did the W.  No biggie, I was able to wipe up most of it with wet and dry paper towels.  If you can't get all of the glue off, just do your best.  It'll dry mostly clear, and if it's noticeable, just touch it up with your paint.

Note:  I used a transparent ruler to create a guide to keep all of the letters straight.  I usually can eyeball things and be just about perfect, but the striations in the wood were throwing me off.  Just a tip to help you out.

Now, the right way to glue the letters:
Apply small amounts of wood glue and spread it around with your finger until it covers the back of the letter evenly and thinly.  Set the letter on the plaque and apply gentle pressure for a few moments.  Continue in this fashion, gluing the letters and strings where desired, until all of the letters and strings are in place.
Now is the time to decorate your snowflakes.  I applied a layer of silver paint to the front, then sprinkled iridescent glitter on the wet paint to get it to stick.  Let everything dry for several hours or overnight, for best results.
Okay!  Now we can attach the snowflakes and spray the plaque with a sealing spray.  Tie the clear string onto the snowflakes, making sure to tie the knots securely.  Grab your sparkly plaque and high-gloss spray and some spare newspaper, and head outside on a clear, cool day with low humidity.  Be sure to read the application instructions on your spray can and follow the instructions CLOSELY.  If you don't have proper ventilation when using the spray, the fumes and odor will build up very quickly.  Spray everything with the clear coating until you get the finish you want, and allow this to dry for about 24 hours.  Using the spray is an optional step, really; I sprayed mine with a coating of acrylic in the hopes that it would prevent the glitter from flaking off of the letters when I pack the plaque away with the other decorations.  Constant handling would cause it to wear off over time, so I wanted to protect it.  It's entirely up to you, though.

Well, now your done.  Stand back and admire your sparkly new wall art.  I hope you have as much fun as I did making this!  I plan on making another next week to go with my fall decor, and I'll post pictures of that too.  It'll look a little different, but the process will be the same.  SPARKLY!!!!!


Friday, September 14

To Put You In the Mood For Fall

I finally got around to setting out my fall decor today.  It's officially autumn!  Well, in my mind, anyway.  We had cool weather today, rainy with a hint of leaves changing in the air.  Just a beautiful day!  During the week, I went to Jo Ann Fabrics and purchased two yards of a fall fabric to cover the mantle that will double as a Christmas cover, too.  I saved money!  (Insert the hubs rolling his eyes right here.)  It worked perfectly to fold the two yards of fabric, with right sides together, the long way (the same way it's folded on the bolt, just inside-out) then run a seam along the sides, turn it right-side out, iron, and voila!  An elegant mantle cover for the next three months.  Economical but classy.  I took a few pictures of some of the decorations, and wanted to share them with you.  Coming this weekend: a tutorial for a winter decoration for your wall or door!
Our little kitchen table
Looove this fabric
Indian corn
Mantle

Primitives

Loves me some Boyd's

Even the movies look ready for fall
I hope you have a wonderful fall decorating season!

ShareThis