Wednesday, February 20

Dresses of the Past...1700s-1840s

"Likewise, I want women to adorn themselves with proper clothing, modestly and discreetly, not with braided hair and gold or pearls or costly garments but rather by means of good works, as is proper for women making a claim to godliness." - 1 Timothy 2:9-10, NASB

I mentioned back in the summer that I planned on making a new dress for my volunteer time at the living history farm outside of town here.  I've finally gotten around to doing some research and beginning to create a design I like, which I will share here.  I'll also share how I go about creating a design from research, instead of going off of a ready-made pattern.  I find that creating my own design is actually easier, because I can tailor it to my exact measurements and specifications.  I find myself making all sorts of adjustments to ready-made patterns purchased at the store, so if I'm capable of making something specific to me, why not go for it?  I love to do the research before I create my designs, and knowing that no one else has what I've created.  However, documented clothing from the 1840s is a little bit rare, really.  It's between the Regency period, which dates roughly from around 1810-1835, and the well-known fashions of the Civil War.  Many examples exist of the fashions of the Regency time period, because they are so well known due to the popularity of Jane Austin novels.  During this time period, women's clothing is very distinctive with high waists, narrow skirts, and modest, yet low necklines.  In my opinion, this style was a rebellion against the large robes a la francaise, robes a l'anglaise, and robes a la polonaise that were so common in courts and high society from around 1760 to after the American Revolution.  Those are the dresses that were made of exquisite fabrics and had very wide hips (which were actually supported by two individual cages worn around each side of the waist, and doubling as pocket cages).  I tend to believe that after the years of the wars (in America, the Revolution and War of 1812), people wanted to scale back and simplify.  There are numerous examples of fashion items that remain from these time periods.  For more information on each picture, click on the blue link in the photo description.
Robe a la francaise, dating from 1775-1800.  Photo courtesty of the Metropolitan Museum of Art.
Regency dress, 1807-1812.  Photo courtesy of Old Sturbridge Village.
Once you start getting out of that and into the 1830s, the collections of clothing examples becomes more sparse.  There are still examples, of course, and from those examples one will notice the stark style difference in sleeves, which become strangely puffy and large to the point that sleeve pads were used to make the sleeves puffier (think pillows strapped onto your arms!), and more volume in skirts.  Waists become more emphasized and move back to their natural place on the torso.  Multiple petticoats are added to give the skirt a fuller appearance.
1830s day dress with gigot sleeves.  Sleeve pads (below) would be worn at shoulder level or just below the armpit area for this dress.  Photo courtesy of Mary's 19th Century Clothing.
Sleeve pads, worn around the arms for added volume in the 1830s.  Photo from the Kyoto Institute.
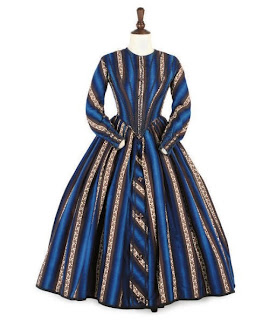
By the time you get into the 1840s, what examples of clothing styles we have reveal sleeves that have reduced in puffiness to a degree, and have become more narrow down to the wrists.  Emphasis is on the appearance of a narrow waist and almost a triangular-shaped, somewhat flat-fronted torso, to which a V-shaped bodice also contributes.  There is great emphasis on skirts becoming bell-shaped and flared--a trend that continues and seems to explode in size through the 1860s and Civil War (and our collections of historic clothing increases again for the time periods of the Civil War and beyond).  Crinolines and hoop cages are not yet used to create the effect, though; this doesn't occur until the mid 1850s.  Skirt fullness is created by layers of petticoats and/or corded petticoats (petticoats that are stiffened by the addition of stiff ropes or cords sewn into the petticoat material).  Only after the war, around the early 1870s, do skirts become more subdued and narrow again, by the time of the turn of the twentieth century, dresses begin to become smaller, shorter, more revealing, and are ultimately given up in exchange for pants and jeans (this also leads to the start of women shaving legs and underarms, but that's another topic for a different time and someone else's blog).  But I digress...all of that history simply to say that there is not a wide array of patterns available for my time period, 1847, but there are many museums that display 1840s collections online, and from that I am able to study and create my design.

Here are some dress styles that I really like:

Good use of pattern, bold and just beautiful:
I like the sleeve caps of these dresses:
I plan to continue using a v-shaped bodice and button front closure:
I will also use some piping and darts on the bodice.  Here is the design idea that I've come up with:
My fabric.  Absolutely love this.
Sketch of front and back of the dress.  Simple, but appropriate.
Because of the bold pattern of the fabric I purchased, I thought a simpler design might be better.  The previous work dress I designed was also patterned, but it was a bit more muted, and the details that I added were not lost in the pattern.

Clothing in the 1840s were all hand-sewn; sewing machines were not yet found in homes.  They had been invented, but were very new, and therefore, very expensive!  They were not commonplace in homes across America until after the Civil War.  It's a good way to figure out the date of a dress if the style is plain, or uncommon to a certain time period--was it hand-sewn, or machine stitched?  For the sake of time, I'll sew all unseen hems with my sewing machine.  Trims, hems and button holes will all be done by hand.  It's been four years since I did this last...wish me luck, and I'll keep you posted!

Friday, February 15

Crock Pot Chicken and Stuffing Recipe

"A person can do nothing better than to eat and drink and find satisfaction in their own toil. This too, I see, is from the hand of God, for without him, who can eat or find enjoyment?" - Ecclesiastes 2:24-25

Several years ago, my husband was given a recipe for a Crock Pot chicken and stuffing concoction.  He brought said recipe home to me and asked me to make it for dinner.  I obliged.  He liked it.  I liked it.  So we put it in our dinner rotation for a while.  Sadly, it fell by the wayside until a few weeks ago.  Hubby requested it for the first time in ages, so I made it last weekend.  It's very good on a cold day, and a great comfort food.  I just had to share it with you!

Ingredients:
4 boneless, skinless chicken breast halves
4 slices of Swiss cheese
1 can (10.5 oz) condensed cream of chicken soup
1 can (10.5 oz) condensed cream of mushroom soup
1 C chicken broth
1/4 C milk (not pictured)
2-3 C Pepperidge Farm herb stuffing mix
1/2 C melted butter
Salt and pepper to taste


Directions:
Spray your Crock Pot with cooking spray to prevent sticking and make cleanup easier.  Then place your chicken breasts in the pot and season with salt and pepper.   Place a piece of cheese over each piece of chicken.  I had to stack mine, since I was using my small Crock Pot.  Pour broth over top of the chicken.
 

In a medium bowl, combine soups and milk.


Pour the soup mix over the chicken and broth.

Sprinkle stuffing mix over the top (I just eyeballed it, and didn't measure out the stuffing).  Pour your melted butter over the top.

Cook on low for 6-8 hours.  Devour.  Super delicious.  (You can also cook on high for about half the time, but just watch it to make sure nothing burns.)

This is a great meal to throw together in the morning before work and have after you get home, or a great Sunday dinner after church.  It's a great comfort dinner!

Sunday, February 10

Makin' Homemade Vanilla Extract

I am so excited!!  I am stepping out into new territory today--out of the realm of store-bought vanilla extract and into the fragrant world of homemade vanilla extract.  I've been doing a lot of research, and it just seemed like a really neat thing to try.  After poring over pages across the vast Internet plane, I found a great website with a lot of information about different types of beans, and based on that information, I chose three different kinds that I will be using in my vanilla extract: Madagascar, which is the most common bean, described as having "a sweet, buttery aroma", Indian, "bold, dark, tones of smoke and chocolate", and Bourbon, "smooth and creamy, excellent for ice cream, gelato and warm drinks".  Can you imagine all of those qualities floating around and melding together in a bottle over several months?  Soon, they will be like liquid gold in my pantry cabinet.  Now can you see why I'm excited?  This is going to make all of my baked goods go from yummy to OH MY GOSH YOU MADE THAT??  THAT'S LIKE HEAVEN IN MY MOUTH!!  At least, that's what I imagine will be the reaction to every cake, cookie, brownie, and candy that I make for the rest of my life.  They will hail me as queen of the baking world, and somewhere, a statue will be erected in my honor of a giant vanilla bean, because of the awesomeness of my homemade vanilla extract.  Ha, and that's just a little peek into the world in my head :).

So, you are probably wondering, "How does one make a concoction of vanilla extract?"  I thought you'd never ask!  Let's get started.

Here is what you need:
  •  8 oz. vodka--doesn't have to be really high quality, but honestly, the higher quality ingredients that are used, the better quality of the finished product.  It should be at least 35% alcohol (40% is better, and common for vodka).  Don't use a higher concentration than 40% alcohol.  You want a vodka that has no flavor or odor.  Bourbon and rum can also be used, but it will add additional flavor to the vanilla extract.
  • Minimum of five Grade B vanilla beans (here is where you can mix flavors to make it the best!).  You can use the higher priced top-grade beans, but the B grade are sold specifically for making extract.  They don't look as good as the top-grade beans, but are of the same flavor quality.
  • A 10-12 oz. size bottle or jar for soaking your beans and vodka, with a tight-fitting lid.
  • A cool, dark place.
  • Time.  Lots and lots of time.
I'm going to make four 8 oz. batches of vanilla in two full-sized canning jars.  I plan to use the same mixture of full vanilla beans in each batch, and divide up the extra vanilla beans evenly and then add the pieces to the jars.

Here's what you do:
First, successfully locate the vodka.  My husband and I found out that the local grocery stores only carry diluted vodka, 21% alcohol.  That just wouldn't do.  So we drove around town trying to find a real liquor store (we haven't ever needed a liquor store here...we can usually get whatever adult beverages we wanted at the grocery stores.  This was a memory exercise more than anything!).  Once you find your vodka, you'll want to measure it out and pour it in a clean container.  Make sure that the container is big enough to submerge your beans completely.  If they are out of the liquid, the exposed part will dry out.

With a sharp paring knife, split the bean pod down the middle, but don't cut through the other side.  You just want to expose the beans and insides to the liquid.  Some people suggest scraping out the stuff inside of the pod, then chopping everything up and putting it in the alcohol, but it seems unnecessary-really, the beans will soak for so long that the liquid will thoroughly penetrate the bean, and the flavor will be extracted regardless.  You can cut the beans to fit and stay submerged in the jar, though, which is why I cut my beans in half.
15 Madagascar B-grade beans.  They are dried more than top-grade beans, but you get the same effect with vanilla extract using these beans.
The fine, delicious, fragrant insides of the pods.
These are the Indian vanilla beans--notice the difference in appearance between these and the B-grade beans.
And these are the Bourbon vanilla beans...they were by far the plumpest beans of the three I purchased.  They had a tacky, almost licorice-type feel to them when I took them from the package.
Once you've split the beans, place them into the liquor--again, making sure that the beans are completely submerged--and shake the jar a bit.  Now, set the jar in a cool, dark place and let it sit!  Shake it once a week.  Feel free to smell it every now and again.  The extract should sit and steep for at least six weeks.  Some sites recommend letting it sit for six months!  I'd say that six months is extreme, but six weeks is too short.  I'm going to let my jars sit for at least two months, and then test.  I'm also labeling the jars with the date that I made them, so that I have a reference.
Action shot!
These are food-grade sticker labels that can be found with canning supplies at the store.  They wash off very easily.
You can see that the liquid is already starting to change color as the flavor is being extracted!
After you have let your beans sit for months, use a strainer lined with several layers of cheesecloth and strain the liquid.  Do this until you no longer see bits of the beans in the extract (I will drain the strained extract into a clear pitcher, so that I can see the bits).  If you are just keeping it for yourself, you can put it in whatever container you have, though I wouldn't recommend plastic, as certain plastics can leech a plastic-y flavor into your extract.  If you use clear jars/containers, store it in a dark place.  If you purchase cobalt or brown glass bottles, which is what I'll do, you don't have to worry about keeping it in a dark place, because the cobalt and brown bottles will filter out UV light.  I plan to keep some for myself and give some away as gifts, and I will be purchasing the cobalt bottles.  The extract will last indefinitely--a bonus effect of the alcohol.

If you're like me, you wonder a lot about random topics.  In my researching ways to make homemade vanilla extract, I couldn't help but wonder when someone realized that they could extract the flavor of the vanilla from these beans.  Because they are not native to our part of the world, it meant that shipping merchants must have introduced them to us here in the states, but when?  I know that in our cooking at the living history farm, we use rose water for flavoring, and rose water is commonly specified in many mid-19th century recipe that I've seen.  So when was the U.S. introduced to this nectar?  According to the Southborough Historical Society website, in Southbourough, Massachusetts, a chemist/druggist named Joseph Burnett actually created the extract in the 1840s for a woman who had lived in Paris before moving back to the States.  Chefs had used it there, but not in a precise way, to get the vanilla flavor in some of their dishes.  Here is the information quoted from the historical society's webpage:

“In 1847 a [prominent] lady [wife of a wealthy Boston manufacturer] who had lived some years in France, entered the store of Joseph Burnett, the Boston chemist.  She said she was very anxious to procure a vanilla flavor for her creams, sauces and desserts, such as she had been getting in Paris. 

At that time the only extract of any kind in this country for flavoring purposes was a cheap extract of lemon.  A few French chefs used the vanilla bean itself.  This was the clumsy, unsanitary and inconvenient way these chefs got their vanilla flavoring; they would purchase one or two vanilla beans, cut them up and put them in a linen bag, ready to use like a tea ball, to flavor whatever was required.  The results from this tedious, inexact method of extracting the flavor were of course very unsatisfactory.  When the bag was first used it would give the delicious flavor of pure vanilla, but afterwards, when it became diluted, the taste was weak and unpalatable. It was never uniform in strength or flavor.  It was always expensive because the full rich flavor could never be thoroughly extracted.

Mr. Burnett listened to the lady's description of the flavoring she wanted.  This extraordinary request challenged Mr. Burnett’s resourcefulness.  A man ahead of his time, he believed in supplying what his customers needed, if he could.  He busied himself in his laboratory.  He [went to New York] and bought a pound of the very best vanilla beans he could procure [for $3.50] and extracted the rare, delicate flavor of which she spoke, and after long, careful experiments, when he was satisfied with its quality, he made the first Vanilla Extract that was ever sold in this country.  The lady was so pleased she urged him to make more, promising to take her supplies of it from him and to introduce it to her aristocratic friends.  This was the beginning of Vanilla and other extracts in this country.”

To read the full story, here is the page link: Southbourough Historical Society

There.  Now you can go on Jeopardy! and win the final question.  I always feel smart when I can answer the Final Jeopardy! question.

Here is the post for straining and bottling the extract after it's been steeping for a few months: Vanilla Extract After Three Months.

I'm not endorsing or being sponsored by anyone to do this post.  That being said, here is the store that I purchased my beans from: Beanilla.com .  You don't have to buy from them--you can find vanilla beans online at several places, like Amazon, Rose Mountain Herbs, and Amadeus Vanilla Beans.  Same thing with the bottles.  Do some shopping online and find out what best fits your needs.  Then order your beans and make yo'self some homemade vanilla goodness!

Saturday, February 2

The Little Things, Pt. 2


Philippians 4:18-20, NASB:  
“But I have received everything in full and have an abundance; I am amply supplied...a fragrant aroma, an acceptable sacrifice, well-pleasing to God.  And my God will supply all your needs according to His riches in glory in Christ Jesus.  Now to our God and Father be the glory forever and ever.  Amen." 

1 Thessalonians 5:16-18, NASB:  
“Rejoice always; pray without ceasing; in everything give thanks; for this is God’s will for you in Christ Jesus.” 


Since there is just not that much to talk about or share, I decided that a pick-me-up post was in order.  Finally into February, after what seemed like a very long January, this time of the year always feels like winter will last forever.  So instead of giving in to the winter doldrums, I decided that it would be fun to look around and find pleasure in the simple things around me.  So, what are you grateful for?


1) I'm grateful for a warm house in the midst of the snow.

2) I'm grateful for fresh-from-the-oven cookies.

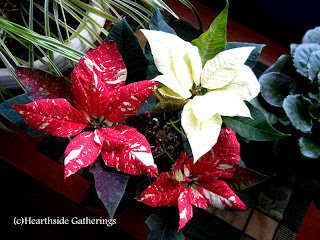
3) I'm grateful for a poinsettia that has lasted past Christmas.

4) I'm grateful for my husband and life-long partner, represented by my stuffed Rudolph.

5) I'm grateful for a God who loves me no matter how much I mess up each day.


6) I'm grateful for a car that runs and a job that pays the bills.


7) I'm grateful for my creativity.  By the way, the ironing board cover works great, and I love it!  No more store-bought covers for me.

8) I'm grateful for the ability to work with my hands.

9) I'm grateful for the dishes that I have to wash every day, the clothes that I iron, and the indoor bathroom that I clean--because God has provided everything we need, and those are little reminders.


10)  I'm grateful for love.

ShareThis