Monday, August 20

Crock Pot Applesauce, Easy Carnation Fudge Recipe and Peanut Butter Chocolate Bars

I was a busy bee on Friday.  I had been looking forward to Friday all week long, just because I had the day off.  I knew I wanted to start on my organization and de-cluttering of the house, I was expecting a package in the mail, and I felt like doing some dessert making.  How was I going to get all of that into one day??  Well, I can tell you that Friday definitely felt like I had been hard at work for 12 hours straight by the time I finally sat down to relax that night.  My feet and legs ached from standing for quite literally all day.  But that's okay, because I felt like I had gotten some things accomplished, which always makes me happy.  You can read about my start on organizing our linen closet here.  But right now, I'm going to share the recipes that I made for weekend sweets.  Here we go!

I began the cooking festivities with fresh apples and a Crock Pot.  I created a simple recipe for making applesauce in the Crock Pot, which I'll share here (there isn't really a recipe, so I'll just tell you what I did):
First, peel, core, and cube 3 lbs. of apples (you can use multiple kinds, just whatever is in your fridge).

Put all of the apples into the pot and add 1 C water.  Cook on high for an hour.
Add 1/4 C cinnamon (or whatever tastes good to you--I just happen to be a cinnamon fiend) and 1/4 C white sugar and reduce the heat to low.
Stir the pot occasionally, to prevent burning or sticking.  Cook on low for at least 6 hours, or until the sauce achieves your desired consistency.  Once it gets to the thickness you like, add more sugar and/or spices to your taste.  If you like chunky applesauce, then you're done!  Scoop the applesauce into a fridge-friendly bowl to cool and eventually refrigerate.  If you like smooth applesauce, use a stick blender or puree the mix in a food processor until smooth.  Then transfer to a fridge-friendly bowl, allow to cool for a few hours, and refrigerate.  Keep in the fridge, and it'll last a week or two (if you don't eat it all first!).

Then, I moved on to the chocolate stage of the day.  I started with making a candy that I usually only make around Christmas, but hubby was jonesin' for some chocolate, which is rare, but being the good little wife I am, I had to accommodate his craving.  I whipped up a batch of Carnation Chocolate Fudge (they call it fudge, but I don't think it would technically qualify as a fudge--it's more like a soft chocolate candy).  You begin with 2 TBSP butter (do not use margarine!), 1 1/2 C white sugar, 2/3 C evaporated milk, and 1/4 tsp salt:

Turn the heat on medium to bring the mixture to a simmer.  Stir the contents occasionally to make sure that everything is combined.  As soon as the mixture comes to a simmer, set the timer for five minutes.  This is very important.  Any longer, and you end up with a dry, crumbly chocolate.
When the five minutes is up, turn off the burner and remove from the heat.  Add 1 tsp. of vanilla, and mix well.  Then add 1 1/2 C of semi-sweet chocolate chips and 2 C mini marshmallows, and stir until everything is combined and smooth:
Now, line an 8x8 or 9x9 pan with foil:

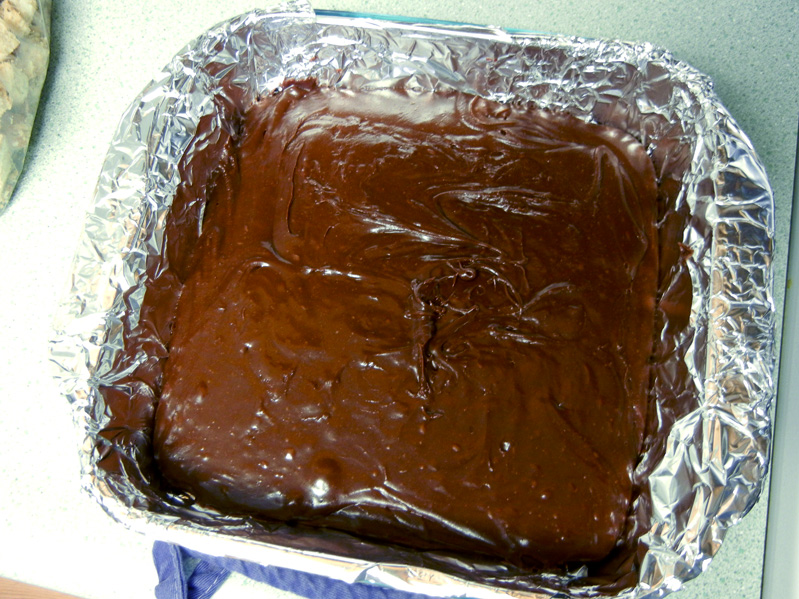
And pour the chocolate mixture into the pan.  Tap the pan against the counter to settle the chocolate and pop air bubbles that might be inside.  Allow the pan to cool at room temperature until the mixture stops steaming, then place plastic wrap over the top of the chocolate to keep fridge odors from penetrating the candy.  Refrigerate for at least two hours, or overnight (overnight is best).  When you go to cut the fudge, use a long sharp knife, and wipe the blade with a wet towel between each cut to get clean cuts.  Super easy and really tasty recipe!

To see the recipe, click here.

The final dessert I made was all for me, although hubby has eaten some too.  This is the peanut-butter-and-chocolate-is-my-favoritest-ever-combo dessert.  Introducing: crunchy chocolate peanut butter bars.  I actually came across this recipe on Pinterest, and it intrigued me.  And after I made it the first time, I vowed to never forget it, and make it every chance that I got.  PMS is a great reason to make it.  But first, a little prep work.  Line an 8"x 8" pan with foil, then butter the foil and set this aside (I only had a brownie pan available, but that worked just fine).
Then, the recipe calls for an addition of crushed graham crackers, and I always enjoy this part.  Take five whole graham crackers and place them in a resealable baggie.  Begin the graham cracker carnage: I used the flat side of a meat mallet for crushing my crackers.  This is a good time to release any tension and frustration that you might be feeling at the moment: "Why" smash "doesn't" smash "anyone" smash "ever" smash "read" smash "my" smash "blog" smash, or something like that.

Now, let's commence with the making of the goodness.  You begin with a stick of butter.  Sounds good already, right?

Once melted, remove the butter from the heat.  Then add 1 3/4 C powdered sugar and stir until the mixture is smooth.

Now, add in the peanut butter and the crushed graham crackers and stir that until well combined.
Spread the peanut butter mixture into the buttered pan and set this aside for a moment.  Now, in the same pot that you made the peanut butter mix, melt another 1/4 C of butter.  Once melted, add 1/2 C of chocolate chips (I used semi sweet) and stir until almost melted.
Remove from heat to prevent burning, and stir to melt the rest of the way.  Spread this chocolate over the peanut butter and refrigerate for at least a half an hour before cutting (I prefer longer, though).  Store these in the fridge in an airtight container or wrapped in foil.  To see the original post and the website where I found this incredible recipe, click here: The Brown Eyed Baker.
Owl Corner
Photo from National Geographic
Today I'll tell you about the Spotted Owl.   This neat guy is usually found in forests along the West Coast and areas of the southwest United States, including stretching into Mexico.  They have been at the center of the discord between loggers and tree huggers in the Pacific Northwest.  They range in size from around 16" tall to 19" tall, with an impressive wingspan of between 40"-50".  Females are usually slightly larger than males.  The females will lay a clutch of between 2 and 4 eggs in nests found 60'-100' up in trees.  The baby owls are born pure white, and develop their brownish color and spots as they grow.  These owls live in old-growth forests--forests that are at least 200 years old.  Rarely are they found in newer forest areas.  They tend to prey on small mammals and rodents, such as flying squirrels, rabbits and wood rats.  They have also been found to have a long lifespan, up to 17 years.  These owls are considered threatened because of the loss of habitat.

Information from Owling.com and The Owl Pages.

My husband and I started a new Bible Study this weekend.  It is about finding joy in the Lord, and we had an interesting discussion about the differences between happiness and joy.  It seems to us that happiness is more of a temporary feeling or emotion, whereas joy is a deep contentment that does not go away or fade over time.  The study used Matthew 5:3-12 as a great basis for finding true joy in all that the Lord does:
Blessed are the poor in spirit [humble], for theirs is the kingdom of heaven. Blessed are those who mourn, for they shall be comforted.  Blessed are the gentle, for they shall inherit the earth.  Blessed are those who hunger and thirst for righteousness, for they shall be satisfied.  Blessed are the merciful, for they shall receive mercy.  Blessed are the pure in heart, for they shall see God.  Blessed are the peacemakers, for they shall be called sons of God.  Blessed are those who have been persecuted for the sake of righteousness, for theirs is the kingdom of heaven.  Blessed are you when people insult you and persecute you, and falsely say all kinds of evil against you because of Me.  Rejoice and be glad, for your reward in heaven is great; for in the same way they persecuted the prophets who were before you."  In order to find true peace in the Lord, we must become the person that He wants us to be, by slowly changing us through our life experiences.  We must trust in all that the Lord does in our lives, even when we perceive it to be a bad thing.  No parent wants their children to be sad or to suffer, so why do we think that God wants that for us?  No, He doesn't want that!  He just has to use those times to mold us into the person that He wants us to be!  In that we can and should find a deep joy and contentment in all that the Lord does.  It just won't always be easy.

Sunday, August 19

Organization...Less is More!

Well, I started on my reorganizing Friday.  I feel like I accomplished something!  I worked on the linen closet in the bathroom, and rearranged our kitchen pantry and some of the drawers in the kitchen.  I threw away things that I hadn't used, which enabled me to find places for all of the items that I decided to keep.  That would be my main tip here--go through your closets before you start to organize.  Get rid of things that you haven't used in a while...I always have "I didn't know I had that!" moments when I start cleaning.  A good rule for me is how long it's not been used: if it hasn't been used or needed in the last six months, unless it's holiday decor that goes out once a year, then it's not worth keeping.  Set it aside for a garage sale or pitch it.  You'll be happy you did, because after a few weeks, you won't remember that you ever had it anyway!  This is the approach I took.
Dun-dun-dun...the linen closet of doom
Our bathroom linen closet gets messy.  It's our  main storage space in our bathroom for not only our towels, but also any and all personal toiletries and bathroom-related items.  Oftentimes, I just put things on the shelves when unpacking my groceries from the store, and they usually don't end up next to other similar items.  I try to reorganize it every so often so that I can take a proper inventory of what we have and what we need, but it becomes difficult when I can't see what I have.  So, I purchased four baskets at Meijer for $4.50 each.  They were just white rigid plastic, with tall sides and flat bottoms.  I set each basket out on the floor and began pulling items out of the linen closet.  I placed similar items in the same basket, and threw away items that were either never used or expired. I was able to successfully fill (but not overfill) all four baskets, and now have a great system for being able to tell what I have and what I need.  I also used a small tub that I had to throw all of my loose cleaning supplies and bottles in for the floor/bottom shelf.  I successfully reorganized my closet and spent under $20, and am happy with the result!  Now, instead of knocking over a bottle of mouthwash to get to the cold medicine, all I need to do is pull out the basket with all of our medicines and first aid supplies, and then put it back.  Easy peasy!  It looks a lot better, too.  I just need to label the bins so that hubby can find whatever he might need.
First shelf: pthb.  Before picture.  I'm so ashamed.
More than half of what was on the first shelf fit in this bin.  I did this for both shelves and all of the items in the closet.
Second shelf.  Needs help.  Again, ashamed.
First shelf--after reorganizing.  I left a few things out that I use at least once a day.
Second shelf.  I was able to fit two bins on each shelf and still have room for extra items.
Bottom/floor space.  I keep my cleaning supplies in here, but had extra that didn't fit in the caddy.  I used a tub that I already had to put all of the extra bottles and supplies in , and then pushed it to the back to make room for the TP.
And voila!  Linen closet reorganization complete!
I hope this helps you and gives you a few ideas if you are trying to reorganize.  I also started working on my kitchen, reorganizing and packing away items that I don't use regularly.  I will go into that in another post soon to come!

Thursday, August 16

Interiors on a Tight Budget

I don't know why this never occurred to me before, but with the updates and upgrades that we've done to our house, I've never really shared any of the reasons why we do what we do.  I have a degree in Interior Design, so I thought I'd share some of my simple tips and suggestions for anyone else in our position (aka, champagne tastes on a beer budget, as Dave Ramsay would say).  Well, in the event of the remote possibility of putting our house up for sale sometime in the not-too-distant future, we are undertaking another project on our house: updating our kitchen.  Last December, we remodeled our one and only bathroom, and we've finally recovered from that debacle.  Now, we don't have $10,000 to spend on antique firearms, so we definitely don't have $10,000 to do a remodel of our kitchen.  Instead, we are going to work with what we do have: less money, and our own elbow grease (and perhaps we'll borrow someone else's elbow grease, too).  Here are a few tips to remodeling/redecorating what you have with what you have:

Tip #1)We took a day a few weeks ago to run over to Menard's and pick out new drawer pulls and hinges for our existing cabinets.  This was the least expensive part of the upgrade, and really, it can cost as much or as little as you would like.  It all depends on what you pick out!  We switched all of our cabinet hardware from the oh-so-fashionable brass of the '80s and early '90s to a brushed-nickel finish, that will soon coordinate with the new faucet that will fill our new sink with water.  It's truly amazing the difference that a small change like the hardware can make in updating a kitchen!  Now, I mentioned that we will also be replacing the sink and faucet, and those will go along with the new laminate countertop that we have on order.  We will be doing those projects in a few weeks, when the counters come in.  Which brings me to the next tip--
Old brass on left, brushed nickel on right
Old brass, tarnished and in bad shape
New brushed nickel hinges
First set finished!
Tip #2) Update your countertops while keeping your existing cabinets.  Countertops are pretty essential in a kitchen--you really can't work without them.  Therefore, update them accordingly!  In our case, we have a ranch house that was built in the 1960s in a neighborhood development (one of millions that went up during the housing boom of the '50s and '60s, as the baby boomer generation aged and were looking to buy their first house for their new families).  These houses were built quickly and cheaply to accommodate the growing population.  The house, while well-kept and at one time not that long ago used as a parsonage, was updated over the years using lesser-quality finishes, which brings us to today.  Because we are keeping the cabinets, we needed to go with something that wouldn't upstage the quality of the stock cabinetry of twenty years ago--and by that I mean, don't put a granite countertop on inexpensive, low-quality stock cabinets, because it just won't look right.  The finishes in your home should all match, not only in color, but also in quality.  Oddly, I've found that building materials of today, even though they may be stock items, seem to have a higher quality than those from fifteen or twenty years ago.  So, all of that to say this: laminate countertop was the only matching material to consider for our countertop replacement.  Even solid surface material would have looked too upscale (can you tell I hate my cabinets?) in an objective viewer's opinion. Currently, we have green counters.  I don't know why green.  They came with the house.  Fortunately, it's not the mildew-green or avocado green of the days of yore, it's much more minty in color, as you might have noticed from any photos that I have posted here or on my food blog.  It has been the bane of my husband's existence ever since we purchased the house, and we are now going to a neutral off-white with other flecks of neutral tones in it.  We repainted the house when we moved in, and the kitchen became blue, which helped tone the green countertops down a bit, but it was never palatable for hubs.  He's really excited to get this done.  Oh-and one other idea: you can paint your existing cabinets if you really want to give them a new look.  It seems to me that this idea only works some of the time, and the rest of the time it doesn't look good at all.  You have to have a solid picture in your head of the end result, or it will just look bad.  We are not going to do that anyway, but I had considered it in the past.  I think that in our case, it would be a "just look bad" situation if we painted the cabinets.  

Tip #3) Update your sink and faucets.  This is also a small change that can add instant appeal to someone looking to purchase a house.  It may seem like a small thing, but when a stainless-steel sink that has been around for years starts to accumulate that dull finish, and maybe some rust or other stains that Soft Scrub just can't remove, it makes everything else look dingy.  We chose to dump our stainless steel and replace it with a solid-surface sink.  I know what you're thinking--"didn't you just say that it was too upscale of a finish for your kitchen??"  I did indeed say that; however, I'm of the opinion that it's okay to upgrade your sink a step.  You use your sink for some heavy-duty stuff, right?  So get something a little heavier-duty to do the job!  What we chose was a plain white solid surface sink that is an inch or two deeper than our current tubs.  I desperately wanted a deeper sink for larger pots and pans, because ours just wasn't cutting it--it seemed like I was constantly splashing soapy water out of the sink when I would wash roasting pans and such.  We chose the solid surface sink to be purposefully plain in appearance, so that it would still fit in with the rest of the kitchen.  So yes, we kind of upgraded our selection there, but it's really not a big upgrade, and I stand by our decision.  And to go with the sink, we will be replacing the very plain chrome-finished faucet/sprayer combo with a slightly more decorative faucet/sprayer combo.  By faucet/sprayer combo, I mean that the faucet actually detaches to become a sprayer--all in one.  This one will be brushed nickel, to match the rest of the metal finishes in the kitchen.
Our new faucet, just waiting to be installed
Plain sink, but made of solid surface material

To sum it up (pardon the pun), here's an idea of the costs:
Kitchen hardware: $100
Sink: $150
Faucet: $120
Countertops: $350 (the biggest expense)
Garbage disposal (because it needs to be replaced, so why not?): $115
Miscellaneous plumbing parts, glues, nails, etc: Yet to be determined
Total so far: $700

This may sound like a lot, but really, to give a kitchen a facelift, it's not bad at all.  We will be saving money because we will be doing the installation ourselves (and with some help from others who actually know what they are doing), and we also were able to get an 11% rebate at Menard's, because it's a promotion that they run occasionally, so we will be getting about $80 in store credit for Menard's.  If you aren't in a hurry to complete your project, you can also save money by waiting until the individual items go on sale, instead of buying them all at once like we did.


The next thing on my list to do is reorganization. Here is a list of spaces in the house that I plan on reorganizing:
*Linen closet--reorganize with tubs and labels
*Closet shelves in bedroom
*Drawers in kitchen
*Pantry reorganization
*Closets

I will be posting my tips on reorganizing these tight spaces in the posts to come!  I've already started on the linen closet in the bathroom.  Yes, I'm facing my fears.

For those of you who don't care at all about decorating or interior design tips, you can learn something anyway in the Owl corner!

Snowy Owls
Photo from Wikipedia
Snowy owls are known for their white plumage and yellow eyes.  This makes them blend in very well in their habitats of the snowy Arctic regions in the summer and the Canadian and Northern United States regions in the winter. They are the largest owl by weight in North America, and have been known to defend their nests against such predators as wolves.  Their favorite meal is lemmings, but they will also hunt other rodents and small animals like rabbits, other birds, and fish.  The owls hatch with dark spots, but the male snowy owls become mostly white as they mature, while the females retain the black spots, making the sexes easy to distinguish. The amount of eggs laid at one time depends on the availability of food, and they usually lay between 3 and 11 eggs at one time.  So pretty!

Information taken from the National Geographic website and allaboutbirds.org.

Saturday, August 11

Balloon Fest!

We had quite a day today!  I've been looking forward to the weekend for most of the week anyway, so having plans for today made it even better.  We started out by going to an auction for antique arms and artifacts this morning.  Hubby had an interest in three antique flintlock rifles that were up for sale, but we walked out with nothing--the total sum of the three guns ended up going for over $10,000.  Needless to say, a bit out of our price range!  But it was still enjoyable.  Afterward, we went for barbecue and then a walk around the mall.  Home for a while (and I might have dozed off while hubby was watching the ballgame), then we decided to go out to the annual Balloon Fest on the south side of town.  I think we have gone every year that we've been here...or maybe missed only one year...I'm not sure.  We knew it would be busy, but we went anyway...neither one of us likes to be around large groups of people, but we survived.  After waiting in line for a half an hour at a concession stand, I was anxious to try deep-fried Oreos for the first time in my life.  I've heard about all of the concoctions of state fairs around the country, and the deep-fried Oreos were really popular a while back.  We found a less-populated area of the park, but a place that still had a good view of the balloons, and I tucked in.  They were great!!  I loved how the cookie was coated with the batter and powdered sugar, and the cookie and cream filling inside was warm and soft.  In fact, the cream was a bit gooey, but it tasted great.  Hubby tried one, but didn't like them.  More for me!  Then it was time for the illumination, and the end of the festival for the night.  There were going to be fireworks afterward, but we weren't planning to stick around for that.  Below are some photos of the coolness of seeing the balloons all lit up in the evening dusk:
Last balloon glow for the night
Someone had a lighthouse balloon!


Oooooh, pretty

Glowing

Again, a lighthouse.  Who knew you could fly a lighthouse?

I liked this picture: low, middle, high

*Drool* Deep fried Oreos.  Five came in an order.  One was already in my belly before it occurred to me that I should take a picture.
Sorry, no Owl Corner this week.  It's past my bedtime.  I just wanted to share the pretty hot air balloons with you.  I hope you enjoy them as much as I do!

Sunday, August 5

Hubby's First Haircut


 Tonight, I feel like sharing a story from the early years of our marriage.  Please to enjoy.
Inside view of the church where we were married

           My husband and I were married in 2004.  During that first year of marriage, we remained living in the same town that hubby was from, where his family still resides, and where his mother, a beautician by trade, continued to lovingly give her son free haircuts on a regular basis.  I had no problem with that, mainly because I had no experience with haircutting.  At all.  As in, I'd never cut any hair--never given a doll a haircut, never cut my dog's hair, never tried to trim my own bangs, nothing.  Nada.  Zero.  Zilch.

After we had been married a little more than a year, hubby had decided to take a job that required us to move from Indiana to Kentucky, and away from his hairdresser.  Since we were moving away, he asked me to learn how his mother does it so that I could cut his hair from then on.  So his mom kindly showed me how to cut his hair one time.  Then I inherited the scissors (so to speak).  It seemed to be easy, and I watched carefully and took lots of mental notes.
Normal hair style and length.  Remember this for later.
 When the time finally came for hubby to have his hair cut, about six weeks after we moved, I went out and bought a little plastic comb, cape, scissors, a spray bottle, and a hair removing brush that his mom had recommended—it had a chamber to put baby powder in it which would be released when a little button on the handle was pushed.  The baby powder was supposed to help the brush get all of the little pieces of hair off of hubby.  Armed with all of the tools I needed, I began to cut his hair.  It was a looong haircut—I worked hard for an hour and a half, or maybe longer.  I was so very nervous!  I did everything just as I had remembered seeing it done.  I pulled the hair between my fingers and cut, cut, cut away all of the extra, and I mean ALL of the extra. My mother-in-law did not tell me how long to leave the hair, so I just put my fingers flat against his head and cut off all of the hair on the other side.  My poor husband!  He usually kept his hair a little longer on top than the back, but not that time!  After all of that cutting, he looked like he had just gotten a buzz cut.  As soon as I had finished, I knew I had done it wrong…and I was so scared and nervous that I started laughing uncontrollably.  You know that totally inappropriate laugh that you can't control, because you are so uncomfortable in the situation that you just don't know what to do?  That's the laugh that bubbled up and spilled out.  And wouldn't stop.
  That tipped him off and he asked for the mirror, so I handed it to him, my hand shaking, trying so hard not to pee my pants.  He was so kind and understanding, because he knew that I was scared to cut his hair anyway, but when he looked in the mirror, his first comment was, “Wow, I didn’t know you could cut hair this short with scissors…” At this comment, I doubled over with laughter.  It took a while to regain my composure.
I still had to brush the hair off of him, and I had loaded the brush full of baby powder.  I pushed the button a few times to get the powder into the bristles and began to brush off his neck, ears and back, and what I thought was a little bit of powder was actually a lot.  Big white clouds of baby powder drifted into the air and swirled around my husband, coating him in white.  He begged me to stop, and when the powder cleared, there sat my beloved husband, pale from the layer of baby powder and at a loss of what to do about his now very short hair.  I lost it, and started laughing all over again.  It was so memorable that we took pictures of his very short hair.  It took about a month for his hair to grow out to the length that he usually liked it, and he wore a hat for almost that entire time!
Photos from the first cut, in the front
There would be no spiking, or any other styling, for at least a month
Epilogue:
I have gotten somewhat better at cutting his hair, although some haircuts are still admittedly better than others.  I will never be as good of a haircutter as my mother-in-law.

Moral of the story: an understanding husband is a precious thing.  And you can get a buzz cut using scissors.

"The heart of her husband trusts in her, and he will have no lack of gain"-Proverbs 31:11.  I love being married to the most perfect match for me in this life.  Thank you, my dear husband, for eight years (and counting) of wonderful adventures, and occasionally, misadventures.  I can't imagine my life any other way.

Friday, August 3

Pumpkin...Where Have You Gone? A Tribute to My Garden

I can't believe we are into August already.  This has been a strange season, for sure!  My garden is doing so poorly this year that it's almost laughable--almost.  There has not been enough time lapsed for me to laugh yet (frowny face).  The one pumpkin that had started growing all of a sudden had a hole chewed in it one day, and the next day it was completely gone from the vine.  I was so sad about that...I think the smell of pumpkin pie is fading, fading...nary a cucumber has grown despite the vines growing well and constantly flowering, and I got one ear of corn that was cute, but was also chewed on when I checked on it.  To spite whatever critter has been munching on my minute harvest that is yet to be discovered, I pulled the ear of corn off, shucked it, and took it inside with the intention of taking a picture of the sad little ear, but then forgot and just threw it away.  If I can't have it, no creature can!  Haha.  I do plan on either making my own hot pepper spray or buying some from the store, if I can find any left, and applying it to whatever is left to see if it is a successful deterrent.  I have some little green peppers that have been untouched by the furry bandit, but I fear it's only a matter of time.  They just don't seem to be growing very large--a fact that I'm sure can be contributed to the intensely hot and drought conditions.  I have gotten a total of six heirloom chocolate cherry tomatoes from the tomato plant, and I still intend to keep the seeds and try it again next year.  I water ever other day or so, and the temps have abated for the time being, but I fear that it's too late to save my goodies.  I never got any beans, and in fact, holes had been chewed in the leaves, so I gave up and yanked out all of the plants.  I'm looking into a product for next year called Diatomaceous Earth, a product that is comprised of pulverized crustaceans called Diatomes.  Insects are literally shredded by the tiny particles of shells, and they dehydrate and die from it.  The bad part is that it kills not only the bad insects, but the good insects too.  It's not supposed to harm earthworms, though, and there is a food-grade version that is specifically made for dusting on your garden plants.  If anyone has used this and had a good experience, or if you tried it and didn't like it, I'd love to know--just leave a message at the bottom of the post. 
The pumpkin that is no more.
Cherry tomatoes soldier on.
Don't mess with my corn, critter.
Cucumbers, cucumber salad, cucumber slices with salt, freezer pickles...none are to be this year.
Tiny green peppers!
My only consolation of my pathetic garden is that I know that many gardens around here have suffered the same fate.  Try again next year, I guess!

Owl Corner - Eurasian Eagle Owl
I like how she seems to be smiling in this picture.
I first saw this gal on our trip to the Cincinnati Zoo, when a zookeeper had her out for people to see up close.  She was beautiful, and her name is Caspian.  Her species of owl is not one to be trifled with!  The eagle owl is one of the largest owls in the world, growing up to two and a half feet tall.  They have a wingspan of around six feet--as tall as a grown man!  They are found across Eurasia, and their favorite places to nest are on rocky cliffs in wooded areas.  They tend to prey on small mammals, such as rodents, but will also hunt smaller birds, and are capable of catching other birds in midair.  They tend to hunt at night, like most owls.  This particular owl in the pictures had recently laid two clutches of eggs, but none hatched.  They typically lay 2-4 eggs at one time.
Here she's showing her beautiful profile.
Information take from The Cincinnati Zoo website and theperegrinefund.org.  Photos are my own and are not to be copied or reproduced without my permission or credit.

There has been a lot of hype lately over Chick-Fil-A and the statements made by the owner of the company, a Christian who has never tried to hide his faith or beliefs.  During an interview, he was asked of his view on same-sex marriage, and he simply stated what he believed--without malice, without hate, and without anger toward those who don't agree.  It ignited a firestorm of hate from the people who are in favor of same-sex marriage.  I, as a Christian, hold the same beliefs of the owner of Chick-Fil-A.  I believe that God created man and woman to be mates, and that is the reason that traditional marriages and relationships have worked for thousands of years.  Man and woman were designed for specific purposes in relationships, and honestly, a family cannot function without both the husband and wife, father and mother roles.  God knew what He was doing when He set this all up!!  I promise.  For those who hold a different viewpoint, be glad you are fortunate enough to live in a country that still permits free speech and you are welcome to your opinion; in the Middle East it is... well...not allowed, to put it lightly.  This debate was never really about gay rights, despite what the media has blown it up to be.  It's simply about having the right and freedom to have a certain moral viewpoint, and the freedom to run a company according to those moral views.  The owner likely keeps these verses close in his heart for running his business: "But remember the Lord your God, for it is he who gives you the ability to produce wealth, and so confirms His covenant, which He swore to your ancestors, as it is today. If you ever forget the Lord your God and follow other gods and worship and bow down to them, I testify against you today that you will surely be destroyed" (Deut. 8:18-19) and "Do not conform to the pattern of this world, but be transformed by the renewing of your mind. Then you will be able to test and approve what God’s will is —His good, pleasing and perfect will" (Romans 2:12).  He is also a businessman, though, and has never, and likely will never, discriminate or refuse service or employment to anyone who does not hold his same beliefs.  And that's all I'll say on the matter.  Except that Chick-Fil-A is delicious.

ShareThis