Showing posts with label Holidays. Show all posts

Tuesday, December 31

Happy New Year!

Hawk taking a break in our front yard tree during a snowstorm
I can't believe that the holidays are really over.  It felt so short this year!  Now all of the Christmas decorations are put away, we've seen all of the family, and my vacation didn't really feel like a vacation at all.  Hubby is fighting a stubborn cold.  This is the time of year when I get the blues. 


Here are a few pictures from the Toledo Zoo Lights Before Christmas this year.  Time to look ahead to the new year, and before I know it spring will be just around the corner.  Enjoy!


Most everyone is talking about their resolutions for the new year now.  I find resolutions are easily broken and hard to keep, so I really don't make them.  I resolve to not make resolutions!  Join me, won't you?

Happy New Year 2014!

Sunday, March 31

Happy Easter!

Romans 6:8-11: "Now if we died with Christ, we believe that we will also live with him. For we know that since Christ was raised from the dead, he cannot die again; death no longer has mastery over him. The death he died, he died to sin once for all; but the life he lives, he lives to God. In the same way, count yourselves dead to sin but alive to God in Christ Jesus."

Happy Easter!  I hope everyone has had a great day.  I had a nice, relaxing long weekend with my husband, who didn't have to work on Good Friday.  It's a nice little bonus holiday for him.


Tomato Seedling Update
Well, I lost my patients.  All but one of the tomato transplants have withered and died.  I was so sad when I saw them the next morning...one of the plants was doing well until a few days ago, when it too began to wilt, and there was no recovering it.  One plant remains, and it's better than none, but I had hoped for a better outcome.  Lesson learned, sadly.

There is still hope for the tomatoes.  Click on this post to see what happened!  Tomato Seedling Surgery 2.0


Gluten-Free...For Now?
I have had quite an eventful week this past week.  After a month of having strange stomach and intestinal problems, I visited my doctor, who thinks I have a gluten allergy.  Not the greatest news for one who lives for gluten-based foods like pizza, pasta, breads, cereals, cakes and cookies.  I have been ordered to remove any gluten from my eating choices for a month, and then return for a check-up.  I haven't had stomach problems up to this point, so I'm hoping that the diagnosis is not accurate.  Honestly, I have really struggled with this, because that completely destroys all of my meal planning for the month.  I have no idea what to make for meals now.  I don't have the time or interest to make every single meal from scratch...I, as most people do, depend a lot on convenient pre-packaged grocery items to help me with cooking.  I spent $56 on baking and cooking substitutions of rice flour, gluten-free all-purpose baking mix, gluten-free bread crumbs, gluten-free quick oats, and a few other things.  Gluten-free items are very expensive.  Should it be determined that I'm allergic to wheat, or that I have celiac's disease, I'm  honestly not sure how I will afford the new grocery bills.  It's a huge adjustment in lifestyle, and one that I really don't want to make unless I absolutely have to.  I'm sure that I'll post more about this at a later time.  For now, I ask for prayer, that God will heal me and my life won't have to drastically change.  It's not just my life that will change; my husband will be affected, too.  It's difficult to know that you will suddenly become a burden or annoyance to others.  I know that those who love and care about me will be understanding, but those people are few, and the world is a huge, unaccommodating place.

If you are interested in more information, visit this page: Non-Celiac Gluten Sensitivity

For some gluten-free recipes, visit my Pinterest board: Gluten-Free.  I have tried the pizza crust recipe posted there (not terrible), and I hope to try more of these these recipes soon!
Another Project
Hubby and I spent Friday and Saturday having fun together.  While we were out on Friday, we went to the local antique shop to look for something specific.  However, I walked out with another set of sleigh bells!  Oops, I just can't help it.  These are smaller bells than the last set I purchased, but I will be restoring these myself.  I sent the last set away to be restored, but I feel confident enough now to want to try this on my own.  These bells are quite a bit smaller than the others, only about 2" wide, and will make a nice small decorative strap in the future.  I'll post the process on here when I have time to start working on them.


Happy Easter...He is Risen!!

Thursday, March 14

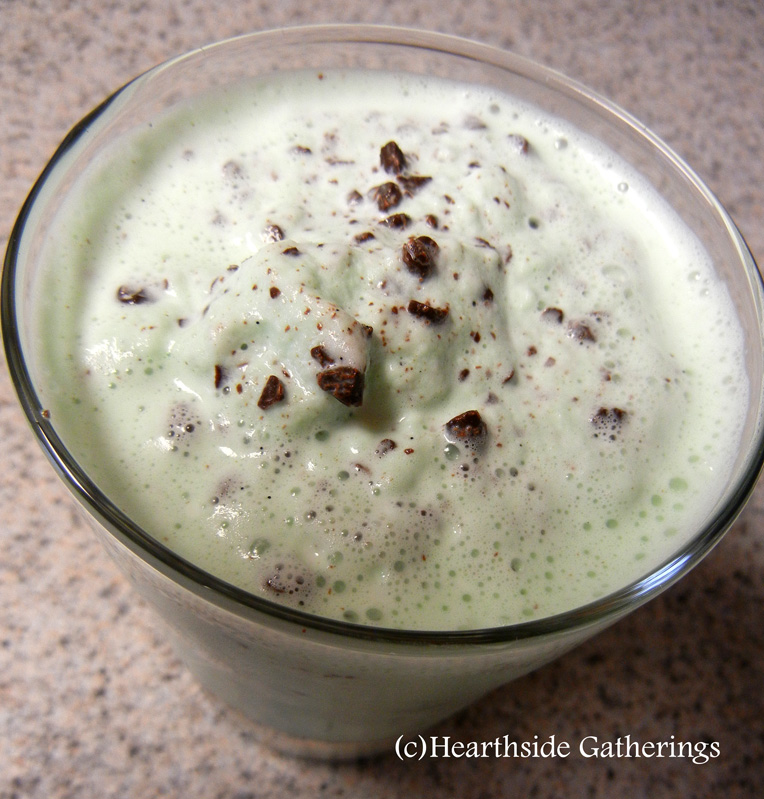
Minty chocolate chip shake for you!

I think I have spring fever.  Last weekend made me long for the coming days of warm weather, tee shirts, open windows, and ice cream.  That made me think of milkshakes.  When my husband was on 12 hour midnight shifts, he'd leave for work around dinnertime and spend the entire night in the office.  Sometimes I'd bring him a milkshake to help his night along.  Thankfully, those days are gone, but we both still love milkshakes.  With St. Patrick's Day this weekend, I started craving a delicious minty shake with chocolate chips, but didn't want to go out and get one, because it's turned cold out again.  What's a girl to do?  I'll tell you what this girl did: improvise!

So how do you go from this:

To this?:

Pretty simple, really!  Get out your blender, here we go!

I'm only making enough for two milkshakes here.  Adjust the measurements according to your needs (i.e., if you need to make four shakes, double this recipe.  If you need to make one shake, half this recipe).

2 C vanilla ice cream of your choice
1/2 C milk (more or less, depending on the consistency you like)
1/2 tsp peppermint extract (go light on this, and adjust it to your taste)
1/4-1/2 C miniature chocolate chips (I like semi-sweet)
5-10 drops of green food coloring

Combine the milk and ice cream using your blender.  Stop mixing a few seconds before you get a smooth texture.

Add your peppermint, chocolate chips and food coloring.  Finish blending together.  Add more milk if you want a thinner shake.

Pour in your glasses and enjoy!

Of course, you can also just blend mint chocolate chip ice cream and milk together and get a very similar flavor, but where's the fun in that?

This would also taste really good using homemade vanilla ice cream, and you would have control over the ingredients in the ice cream, too.  I have an ice cream maker, but didn't have the time to make any.  When my homemade vanilla extract is ready, maybe I'll make time!

Thursday, January 3

French Toast Casserole & Owl Corner Returns!

Over Christmas, my mom and I decided to try a recipe that I had heard about from a co-worker for French toast casserole.  We thought it would be a great dish to serve on Christmas morning, but after looking at the recipe, we realized that we would have to tweak it a bit to fit our needs (the original recipe called for two "large" pans, and there were only four of us, so what were we going to do with the leftover one and a half pans??), and the resulting recipe is what you see below.  It's good, I think you'll like it!


Ingredients:
½ loaf of Texas toast, torn into pieces
4 eggs
1 cup half-and-half
1/2 cup milk
3 tablespoons sugar
2 teaspoons vanilla
1 tablespoon cinnamon
1 teaspoon nutmeg
1 stick butter (unsalted is preferred)
1/2 cup brown sugar
1 cup pecans (optional, we didn’t use)


Directions: Spray a 9x13 baking dish with non-stick cooking spray (don't skip this step--we learned that the hard way).  Spread the bread pieces evenly in the pan, then mix together in a separate bowl the eggs, half and half, milk, sugar, vanilla, cinnamon, and nutmeg.  You could add more spices, or additional spices, if you would like here.  Pour this mixture over the bread, and toss the bread to coat the pieces.  Cover with plastic wrap or aluminum foil and allow to sit in your refrigerator overnight.

In the morning, melt the butter, then mix in the brown sugar.  Pour this evenly over the bread mixture, and then bake at 350 degrees for 30 minutes, or until the bread is golden brown on top.  You can also sprinkle more spices over the casserole before baking it for a little extra deliciousness.  Enjoy with butter and syrup, or my favorite way to eat French toast: peanut butter and syrup.  Soooo tasty!


Owl Corner 
Photo from Wikipedia
Today, we will learn about the Spectacled Owl.  The name pretty well describes its distinguishing characteristic: contrasting feathers around the eyes give this guy a distinguished, scholarly appearance.  One interesting fact about their appearance--the photo on the left shows an adult owl, but the juvenile owls are a photo negative as far as color goes: white head and black "spectacles".  It can take several years for a young owl to change appearance into adulthood.  The size of these owls is medium-large, measuring about 17"-18" fully grown.  These birds are considered anti-social, and prefer their alone time.  Their habitat ranges from parts of southern Mexico south into the northern half of South America, and also Costa Rica.  They are found in tropical rainforests and anywhere with trees, including savannahs and dry forests.  The females will lay a clutch of up to five eggs, but it is typical for only one of the chicks to survive into adulthood.  Those who do survive will prey on mice and small rodents, possum and skunk, as well as insects, spiders, caterpillars, and bats and birds, among other critters. 

I've done several owls for the Owl Corner, and now I'm considering branching out to other animals, namely different breeds of cats and dogs.  What do you think?

Friday, December 21

The Twelve Days of Christmas, Day 12: Fun Family Crafts and Merry Christmas!


I can't believe that Christmas is merely a few days from now, so I want to take this opportunity to wish everyone a wonderful Christmas and a happy New Year!  Whether you're traveling or staying home, I hope that you have a wonderful and blessed holiday.  I'll be back online next year.

I tried to think of something super-neat to post as my last Twelve Days of Christmas Recipes entry.  I thought about recipes and I contemplated crafts, and I decided that crafts would be more fun, especially since most families have children who are going to be on Christmas break, if they are not already.  I decided on a few simple crafts that children and adults can do together, and chances are you have many of the supplies already in your house. 

Day 12: Assorted Christmas Ornaments

My hubby made this ornament when he was six years old!
The first ornament requires a recipe:
4 C all-purpose flour
1 C salt
1 1/2 C warm water

Yes, salt dough ornaments!  Simply mix all of the ingredients together until smooth.  Roll out on a floured surface to the desired thickness, and cut with cookie cutters or shapes found in your kitchen.  Use textured items, such as cheese graters, to create designs in the dough.  If you have rubber stamps, you can stamp designs into the dough.  Punch a hole into the top of the ornaments using a toothpick and bake in a 300 degree oven for about an hour or until the ornaments are hard.  Paint as desired and run string or ribbon through the holes, and allow to dry before hanging on the tree.  A great way to make memories with the kids, and if properly stored and cared for, will last for many years.

Now, while those are baking, you can make the second ornament.  The second ornament requires supplies:

Package of C4 light bulbs (found at Wal-Mart for $0.98)
Glue that dries clear
Glitter of your color choice
16 gauge wire (found in jewelry-making sections of your local craft store-I used aluminum)
Paint brushes
Empty cupcake liner container
Wire cutters, pliers, and round-nosed pliers

You knew I'd use glitter at some point!  These are really easy to make, and beautiful to hang from the tree.  They even bring a hint of nostalgia to your Christmas decor.  Appropriate for slightly older children who can be careful around fragile things.

The first thing you will do is wrap wire around the top part of the lightbulb.  You can do this however you want; I chose to coil it completely around the metal to conceal the screw part.
Be sure to leave a small loop at the top for the decorative hook.
Then, pour a good amount of glitter into the cupcake liner container.  Don't be shy; the more, the better!
Now, paint your glue onto the bulb.
Dip the glue-painted bulb into the glitter, and roll it around until the whole thing is covered to just the way you like it.
Set it aside to dry.  Repeat on the remaining bulbs.
Now, for the hook:  Cut a 12" section of wire.  Hold your wire with the regular pliers, and take the very end of the wire with the round-nosed pliers.  Grip just hard enough to hold the wire in place, but no hard enough to leave tooth marks in the metal.  Begin to wrap the wire, tightly at first, around the ends of the round-nosed pliers.
Slide the straight end of the wire through the loop on the bulb.  Then, create another curl, more loosely this time at the other end of the wire.  Curl until you like it.
Repeat on the rest of the ornaments!


You can also embellish with ribbons or beads.  Be sure that the beads have holes that are large enough to accommodate the size of the wire--all of the beads I had had holes that were too small to fit on the wire.   Be creative!


Luke 2:19-20: But Mary treasured up all these things and pondered them in her heart.  The shepherds returned, glorifying and praising God for all the things they had heard and seen, which were just as they had been told.

Merry Christmas!

Wednesday, December 19

The Twelve Days of Christmas Recipes, Day 11: Simple Apple Crisp

I love apple crisp when the weather cools in the fall.  It makes a great comfort dessert all winter long, too, and I love to eat a warm bowl of crisp on a cold snowy day.  The smell of the apples and cinnamon make the house smell wonderful and homey.  With such an easy recipe, and all of the ingredients most likely already in your pantry, how can you not treat yourself?  Soooo good!

Day 11: Simple Apple Crisp

Ingredients:
1 1/2 C flour
1 1/2 C oatmeal
1 1/2 C sugar
2 TBSP cinnamon (or to taste)
1 tsp baking soda
1 C butter or margarine
2 cans of favorite apple pie filling

Directions:
Grease or butter sides and bottom of 9x13 pan.  Preheat oven to 350*.  In one bowl, empty cans of pie filling.  Add cinnamon and sugar to taste if desired, mix well and set aside.  In separate large bowl, melt butter.  Add flour, oatmeal, sugar, cinnamon, and baking soda, and mix until crumbly.  Pour apple filling into greased pan, and spoon crumbly mixture over top until apples are covered.  Bake at 350* for 40 mins. or until golden brown and center is bubbly.  Keep refrigerated.

Just one more day of The Twelve Days of Christmas Recipes!  Where has December gone?  

Luke 2:17-18: When they had seen him, they spread the word concerning what had been told them about this child, and all who heard it were amazed at what the shepherds said to them.

Tuesday, December 18

The Twelve Days of Christmas Recipes, Day 10: Snickerdoodles

These are a great cookie all year 'round, not just at Christmas.  They are one of my husband's favorite cookies, and around Christmastime, I color granulated sugar with red and green food coloring for a festive embellishment.  This recipe can also be found at Food.com.

Day 10: Snickerdoodles

Ingredients:
1 cup butter
1 1/2 cups sugar
2 large eggs
2 3/4 cups flour
2 teaspoons cream of tartar
1 teaspoon baking soda
1 tablespoon cinnamon
1/4 teaspoon salt
3 tablespoons sugar
3 teaspoons cinnamon

Directions:
Preheat oven to 350°F.  Mix butter, 1 1/2 cups sugar and eggs thoroughly in a large bowl.  Combine flour, cream of tartar, baking soda, tablespoon of cinnamon and salt in a separate bowl.  Blend dry ingredients into butter mixture.  Chill dough, and chill an ungreased cookie sheet for about 10-15 minutes in the fridge.  Meanwhile, mix 3 tablespoons sugar, and 3 teaspoons cinnamon in a small bowl (if you want colored sugar, add a few drops of green or red food coloring to the sugar mixture and mix until the color is evenly distributed).  Scoop 1 inch balls of dough into the sugar/ cinnamon mixture (use a cookie scoop, if you have one).  Coat by gently rolling balls of dough in the sugar mixture.  Place on chilled ungreased cookie sheet lined with parchment, and bake 10 minutes.  Cool on cookie sheet for two minutes, then remove.


Luke 2:16: So they hurried off and found Mary and Joseph, and the baby, who was lying in the manger.
 

Sunday, December 16

Twelve Days of Christmas Recipes, Day 8: Chocolate Fudge

A common treat for us around Christmastime is chocolate fudge.  This is the Carnation fudge recipe, with a link at the end with more detailed instructions, which I found online (thank you YouTube and Alton Brown of Good Eats, whose explanation of fudgemaking changed my life).  This is a little different than regular fudge, but is still sooo tasty and very easy--with all of your ingredients measured out and ready to go, this will only take about 15 minutes to make!

Day 8: Carnation Chocolate Fudge

Ingredients:
1 1/2 C white sugar
2 TBSP Butter
2/3 C evaporated milk
1/4 tsp salt
1 tsp vanilla
1 1/2 C semi-sweet chocolate chips
2 C mini marshmallows
Walnuts or pecans (optional)

Bring first 4 ingredients to a simmer over medium heat.  Simmer for 5 minutes (set a timer) and stir occasionally.  Turn off heat and remove from burner after 5 minutes.  Stir vanilla into hot mixture and combine.  Add marshmallows and chocolate chips, and stir until smooth.  Pour into an 8x8 or 9x9 pan lined with foil.  Tap against counter to settle and pop air bubbles.  Allow to sit on counter until chocolate stops steaming, then place plastic wrap over the top and refrigerate for at least 2 hours, or overnight.  When ready to cut, use foil to lift chocolate out of pan and flip onto a cutting board.  Cut with a long sharp knife, and wipe blade with a wet towel between each cut.


To see the original post with step-by-step instructions and photos, click this link: Monday, August 20, 2012

Luke 2:13-14: Suddenly a great company of the heavenly host appeared with the angel, praising God and saying, “Glory to God in the highest heaven, and on earth peace to those on whom his favor rests.”

Friday, December 14

The Twelve Days of Christmas Recipes, Day 7: An Ornament Pattern!

I thought I'd do something a little different today for the TDoCR.  I like to do little crafty things, and I created some patterns for cloth Christmas ornaments.  Here are a few patterns for you to make!

Day 7: Primitive Ornament Patterns

Materials needed:
1/2 yard osnaburg fabric or burlap fabric
Embroidery thread, colors of your choice
Needle
Straight pins
Poly-fil fiber fill, or similar
10" length of coordinating narrow ribbon

What to do:


Unfortunately, I can't figure out how to link the picture to the PDF file, so just right click on the picture and save it, and print it at your leisure!  To get the scale I used, the gray area should take up the whole 8 1/2" x 11" paper.  Sorry about that; I had good intentions!  There are times that I wish I knew someone who could help me with HTML code.  I have to try and figure it out on my own when I want to do something.  But I digress.  

The tree is cut on a fold, and you will need to cut two of them.  You will also need two of the bird.

I'll walk you through the steps for the bird.  First, sew a face and wing on the front of the bird.  Do what you like, make him as fancy or primitive as you like!  Then sew your length of ribbon on the back piece.  I recommend completely hand-sewing the pieces to give them more of a homespun look.

Next, pin the front and back pieces together, right sides out.  Sew a running stitch around the entire bird, leaving 1"-2" open to stuff the bird lightly with fiberfil.  Then go ahead and sew him closed.  That's it!
Do the same with the tree.  You can embellish it as little or as much as you like; it all depends on your taste.
I think that these would be simple ornaments to make with your child if you are trying to teach them to sew.  You can use embroidery or regular sewing techniques to create them!

I do ask that you please only use these patterns for your home.  Please do not use these patterns for resale.  Thank you!

This is a great project to do while watching Christmas shows.  You'll see that my stuffed Rudolph was watching "Rudolph the Red-Nosed Reindeer" while I wrote this post.  He likes to call it his autobiography. 

Luke 2:12: This will be a sign to you: You will find a baby wrapped in cloths and lying in a manger.”


Wednesday, December 12

Twelve Days of Christmas Recipes, Day 5: Chocolate-Dipped Macaroons

These are an easy little confection--quick to mix together, and about as simple as you can get.  My husband loved these, and hopefully you will too!

Day 5: Chocolate-Dipped Coconut Macaroons


Ingredients:
3 large egg whites
2/3 C sugar
1 1/2 tsp vanilla extract
2 1/2 C dried shredded and sweetened coconut
3 oz. semisweet chocolate (approx. 1/2 cup)

Directions:
Preheat oven to 350*.  Line one or two cookie sheets with parchment.  In a large bowl, whisk egg whites and sugar.  Add vanilla and coconut, and stir to combine.  Drop by level tablespoon onto cookie sheet, about 1" apart, and bake for 15-18 minutes (until tops turn light brown).  Put cookies on rack to cool for 30 minutes.  Place in fridge to chill.

Melt chocolate over double boiler over low-medium heat, stirring frequently to prevent burning.  Take each cookie and dip tops in melted chocolate, and return to cold cookie sheet.  Place dipped cookies into freezer until chocolate sets, about 20 minutes.  Store cookies in the fridge in an airtight container.

Frosty morning!

Luke 2:9-"An angel of the Lord appeared to them, and the glory of the Lord shone around them, and they were terrified."

Tuesday, December 11

Twelve Days of Christmas Recipes, Day 4: Easy Dinner Rolls

Impress your holiday guests with fresh homemade bread for dinner! I love making this recipe.  They are easy, just as the name says.  This recipe can be found on Simple Daily Recipes.  They are delicious and fast--I highly recommend these!!

Day 4: Easy Dinner Rolls

Ingredients:
1 package quick-acting active dry yeast (2 1/4 tsp. or 7 grams)
1 1/3 cup milk (105º to 115ºF degrees)
3 to 3 1/2 cups flour or whole wheat flour
3 tablespoons oil
1 tablespoon sugar
1 teaspoon salt
1 tablespoon melted butter
coarse salt (optional, I don't use it)

Dissolve yeast in warm milk in electric mixer bowl.  Stir in 1 cup flour. Beat until smooth.  Stir in enough remaining flour, oil, sugar and salt.  Mix on low electric speed until soft dough forms.  Cover and let rise in warm place until double, about 45 minutes.

Heat oven 400ºF degrees.  

Prep a 12 cup muffin pan with non-stick cooking spray.
Punch down dough in center and fold over a few times.  Pinch off 1 inch balls of dough and quickly roll in palm of hands.  Put 3 balls to one muffin cup; brush with melted butter; sprinkle with coarse salt.

Bake 12 to 15 minutes, until crust is light golden brown.

Immediately remove from pan.  Store loosely covered.

Luke 2:8: "And there were shepherds living out in the fields nearby, keeping watch over their flocks at night."

Monday, December 10

Twelve Days of Christmas Recipes, Day 3: 7-Layer Bars

I made these for the first time last Christmas.  I don't like coconut in recipes, so I didn't eat any, but my husband really liked these.  They are very rich and decadent--a great treat once a year.

Day 3: 7-Layer Bars

1 (14 oz) can sweetened condensed milk
1 C semi-sweet chocolate chips
1 C butterscotch chips
1 C shredded coconut
1-1/2 C crumbled graham crackers (approx. 8 whole crackers)
1/2 C butter (I used unsalted butter)
1 C chopped walnuts

Directions:
Preheat oven to 350*F.  Place butter in 13x9 pan, and place in oven until butter is melted.  Swirl to coat bottom and sides with butter.  Spread crumbs evenly over bottom of pan.  Layer chocolate chips, butterscotch chips and nuts over crumbs.  Pour condensed milk over nuts.  Sprinkle coconut over condensed milk.  Bake 25 minutes or until edges are golden brown.  Let cool.

Luke 2: 6-7: While they were there, the time came for the baby to be born, and she gave birth to her firstborn, a son. She wrapped him in cloths and placed him in a manger, because there was no guest room available for them.

Sunday, December 9

Twelve Days of Christmas Recipes, Day 2: Chicken Pot Pie--My Hubby's Favorite Recipe!

I have really been in the mood for comfort food lately.  I think it's a combination of the (constantly) changing weather, which wreaks havoc on my sinuses, and the shorter days that accompany this time of year.  I don't remember where I got this recipe for chicken pot pie, but I'm almost certain that it was online somewhere.  I've adjusted it to my tastes, and wanted to share it.  My husband says it his favorite recipe for pot pies.  You can't get much higher praise than that!  Here's the recipe, and I hope you enjoy it as much as we do on cold, blustery nights!

Day 2: Chicken Pot Pie
Ingredients:
1 lb. cooked boneless skinless chicken, cubed or chopped
1 C sliced carrots
1 C frozen peas
1 or 2 cubed potatoes
1/3 C butter
1/3 C flower
1 3/4 C chicken broth, + some for boiling
2/3 C milk
1 or 2-9" pie crusts (I use Pillsbury refrigerated pie crusts--it really has a good flavor for being pre-made)
Seasonings: chicken base (not bouillon cubes, there is a difference), garlic, oregano, paprika, poultry seasoning, salt, pepper--all to taste

Instructions:
Preheat the oven to 425*.  Lightly spray a pie pan or round 2 quart or larger casserole dish.  Prepare your chicken to your preference; I actually boil the chicken pieces whole in water mixed with chicken base.  When they are fully cooked, remove from the water and set on a cutting board to cool.  Cube or shred, and set aside.
 
Pour out the water in the pot, but keep the pot for the next step!  In the same pot add the carrots, peas, and potatoes.  Add enough chicken broth to cover things in the pot (hint: I pour my 1 3/4 C of broth into a measuring cup and set it aside, then add the remaining broth to the pot.  If it's not enough to cover the veggies, I just add enough water to cover everything).
Boil veggies for 15 minutes, then remove from heat.  Drain the veggies and set aside.  In the same pot again, melt your butter over medium heat.  Once it's melted, add your flour and spices.  Go light on the spices now; you can add more to make it great later.  Once those are combined and resembling a paste, add your chicken broth and milk.  Simmer this over medium-low heat until it's thickened to your liking.  Remove it from the heat.  Taste it and add more spices if necessary.  Mix the chicken, drained veggies, and gravy together in your casserole dish, and add the top crust.
Because my casserole dish is a bit smaller than the pie crust, I fold the extra over to create a thicker outer crust.
 
Be sure to cut slits in the crust for ventilation.  Bake for 30-35 minutes, or until pastry is golden brown and filling is bubbly.  Allow to sit and cool for 10 minutes before serving.

Sometimes I like to have a top and bottom crust.  If you are making the pie with a bottom crust, bake the crust for 5-7 minutes in the pan before adding the filling.  It will help the bottom crust from getting soggy.  This is soooo good and filling on a cold winter's night!


Luke 2:4-5: So Joseph also went up from the town of Nazareth in Galilee to Judea, to Bethlehem the town of David, because he belonged to the house and line of David.  He went there to register with Mary, who was pledged to be married to him and was expecting a child. 

ShareThis