Showing posts with label Sewing. Show all posts

Wednesday, November 20

Birthday Reflections and a Simple Side Table Mat Pattern


Therefore we do not lose heart, but though our outer man is decaying, yet our inner man is being renewed day by day.  For momentary, light affliction is producing for us an eternal weight of glory far beyond all comparison, while we look not at the things which are seen, but at the things which are not seen; for the things which are seen are temporal, but the things which are not seen are eternal.--2 Cor. 4:16-18

Well, here I am, another year older.  My birthday falls in my favorite season of the year...when I look out the window and see the trees in vibrant colors, with a carpet of fallen leaves covering the ground.  Many trees are a topaz yellow color, with some splashes of ruby, emerald and orange garnet interspersed.  I enjoy the coolness in the air and the smell of fires burning.  I enjoy the cloudy gray days and cool rain, but I also take pleasure in seeing a sapphire sky behind all of the beautiful colors of nature on a clear day.  I anticipate the arrival of winter, when the snow blankets everything in a dazzling display of glittering diamond snowflakes.


There's so much to be thankful for, too.  During this time of the year, we start to turn our thoughts toward Thanksgiving--traditionally a time to give thanks--but it's important to stop and realize just how blessed we really are all of the time.  Every time I come into the house from outside, I think about how glad I am to have a warm cozy house to live in.  I'm thankful for my health, despite the problems I've been having.  I'm so thankful for my wonderful husband and best friend.  I'm grateful that we always have food to eat in the fridge, and the extra income to eat out if we so choose.  I'm blessed to not have to worry about any basic need being filled.  There are many who can't say that.  Mostly, though, I'm thankful for the gift of salvation that I have been given, and the assurance that when I leave this life, I'll be with the One who created me, and there's no greater gift to be thankful for in life.  There's a total peace that comes with that knowledge, and nothing on earth can offer that.

In the midst of all of my reflection, I took the time to start making things with my new fabrics.  I created a simple, yet pretty, set of table mats that I thought I would share with you!  The instructions below are for making two matching mats.

You will need:
4-3" x 13" strips of border fabric
4-3" x 12" strips of border fabric
2-9" x 12" center panel of contrasting fabric
2-16" x 13" coordinating backing fabric (I used the same fabric for the backing and front border)
One spool of matching thread
2-2 1/2 yd. packages of matching piping

Do this:
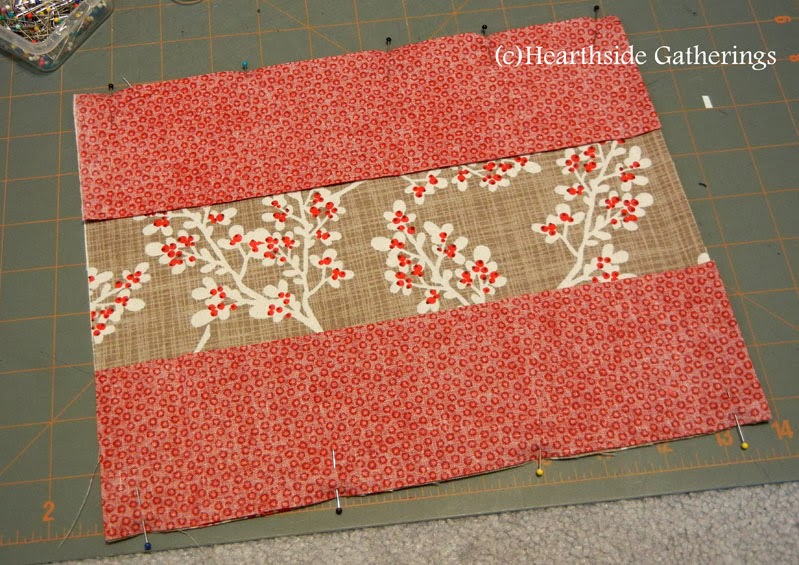
Pin the long sides of the center panel to the long sides of the 3" x 12" strips, right sides together.  Sew these edges using 1/2" seams.  Iron the seams open.

Pin the 3" x 13" strips of fabric to the sides of of the middle panel, right sides together.  Sew these, making sure to keep the seams flat on the sewn piece.  Iron the new seams open.

Cut lengths of piping to slightly larger than each side of the panel.  Pin the piping to the right side of the fabric edge of the top panel.  Line the bottom edge of the piping up to the raw edge of the panel on the right side of the fabric.  Overlap the piping on each corner, and sew along the edge of the piping (usually 3/8").  You can use a special sewing machine foot, but my regular foot worked fine for me.

Pin the backing along three sides of the panel and piping, with the right sides of the fabric together.  Leave the fourth side open for turning out.  Sew along the same line that you created when you sewed on the piping for a guideline.  Iron the edges flat, then turn the last raw edges inward and pin.  Sew along the edge of the piping to close the mat.  Iron the remaining edge flat.


Repeat the steps for your second cover.  You should now have two table mats for your living room end tables!  Great job.  Your overall size should be about 15" x 13".  You can be more creative than me and add batting and quilting, or you can simplify it by leaving out the piping (and skipping a step or two in the instructions).  This is just a basic, simple pattern that you can use as a base for whatever you can create!


Thursday, July 25

More Than I Can Chew

Update: Thanks to Adorned From Above for featuring this post in their blog hop (#62)!

Yes, I've bitten off more than I can chew.  I do it often.  I'm sure I'm not the only one.  Please, please tell me I'm not the only one.

The problem is that my brain works a lot faster than my body.  I'm not an old hen, but I'm also not a spring chicken, either.  My mind comes up with all kinds of ideas that my body just can't keep up with.

Here is one project that has yet to be touched:  a simple mantle runner.  Just one yard of homespun fabric.  All I have to do is cut it in half lengthwise and sew it all closed.  It would take me about 20 minutes to make.  No batting, no quilting, nothing that is even remotely complicated.  But it's not done.  It's just staring at me, laughing.
Another project: produce bags for grocery shopping.  I thought it would be a great idea to get some mesh fabric and make some produce bags for the store, instead of using the plastic bags on the little wire racks.  Again, this is a 20 minute project, maybe 30 tops.  I bought the fabric, and there it sits.
My sleigh bells.  While I sent out the large set to be finished professionally, I did some research on my own about refinishing bells and purchased these two small straps at the antique store.  Then I went out and bought everything I would need to clean and refinish the bells, including professionally-made replacement straps.  I had planned on working on these while my hubby was gone on a trip.  He's been on several trips since I got all of these supplies...so why haven't I gotten around to this?
Here is my fabric for making a new dress for the McKinnis house.  I have the design drawn, but this is a fairly complicated project; it will take a while from the time I draw out the pattern to the last hand stitches in the hemline.  This project, I give myself a bit of leeway on, due to the complexity.  But I've been planning on starting it for about a year now.  Not a whole lot of room for much more leniency.
My husband's scarf.  Pretty self-explanatory.
My work bag.  So many little sewing project in there that I can't keep up.
Here's a piece of Roseville pottery that my neighbor kindly gave to me.  It just needs some cleaning up--a soak in soapy water and maybe a little scrubbing with a toothbrush.  Still not done.
Honestly, this list is just the tip of the iceberg.  I have a bunch of ideas in my head still.  I am also working hard on new items for my Etsy stores (I opened up a second shop just because I was getting too wide of a selection of items in my first one) and am trying to prepare for the upcoming holiday sales.  Right now, I'm concentrating on fall, but it takes up a lot of time.  I spend my evenings on the couch with the hubs, working away, putting all other projects aside.  Whether it'll turn out to be worth it, we'll just have to wait and see.  I'm looking forward to some down time...but I don't think it's coming!

What are you working (or not working) on?


Wednesday, February 20

Dresses of the Past...1700s-1840s

"Likewise, I want women to adorn themselves with proper clothing, modestly and discreetly, not with braided hair and gold or pearls or costly garments but rather by means of good works, as is proper for women making a claim to godliness." - 1 Timothy 2:9-10, NASB

I mentioned back in the summer that I planned on making a new dress for my volunteer time at the living history farm outside of town here.  I've finally gotten around to doing some research and beginning to create a design I like, which I will share here.  I'll also share how I go about creating a design from research, instead of going off of a ready-made pattern.  I find that creating my own design is actually easier, because I can tailor it to my exact measurements and specifications.  I find myself making all sorts of adjustments to ready-made patterns purchased at the store, so if I'm capable of making something specific to me, why not go for it?  I love to do the research before I create my designs, and knowing that no one else has what I've created.  However, documented clothing from the 1840s is a little bit rare, really.  It's between the Regency period, which dates roughly from around 1810-1835, and the well-known fashions of the Civil War.  Many examples exist of the fashions of the Regency time period, because they are so well known due to the popularity of Jane Austin novels.  During this time period, women's clothing is very distinctive with high waists, narrow skirts, and modest, yet low necklines.  In my opinion, this style was a rebellion against the large robes a la francaise, robes a l'anglaise, and robes a la polonaise that were so common in courts and high society from around 1760 to after the American Revolution.  Those are the dresses that were made of exquisite fabrics and had very wide hips (which were actually supported by two individual cages worn around each side of the waist, and doubling as pocket cages).  I tend to believe that after the years of the wars (in America, the Revolution and War of 1812), people wanted to scale back and simplify.  There are numerous examples of fashion items that remain from these time periods.  For more information on each picture, click on the blue link in the photo description.
Robe a la francaise, dating from 1775-1800.  Photo courtesty of the Metropolitan Museum of Art.
Regency dress, 1807-1812.  Photo courtesy of Old Sturbridge Village.
Once you start getting out of that and into the 1830s, the collections of clothing examples becomes more sparse.  There are still examples, of course, and from those examples one will notice the stark style difference in sleeves, which become strangely puffy and large to the point that sleeve pads were used to make the sleeves puffier (think pillows strapped onto your arms!), and more volume in skirts.  Waists become more emphasized and move back to their natural place on the torso.  Multiple petticoats are added to give the skirt a fuller appearance.
1830s day dress with gigot sleeves.  Sleeve pads (below) would be worn at shoulder level or just below the armpit area for this dress.  Photo courtesy of Mary's 19th Century Clothing.
Sleeve pads, worn around the arms for added volume in the 1830s.  Photo from the Kyoto Institute.
By the time you get into the 1840s, what examples of clothing styles we have reveal sleeves that have reduced in puffiness to a degree, and have become more narrow down to the wrists.  Emphasis is on the appearance of a narrow waist and almost a triangular-shaped, somewhat flat-fronted torso, to which a V-shaped bodice also contributes.  There is great emphasis on skirts becoming bell-shaped and flared--a trend that continues and seems to explode in size through the 1860s and Civil War (and our collections of historic clothing increases again for the time periods of the Civil War and beyond).  Crinolines and hoop cages are not yet used to create the effect, though; this doesn't occur until the mid 1850s.  Skirt fullness is created by layers of petticoats and/or corded petticoats (petticoats that are stiffened by the addition of stiff ropes or cords sewn into the petticoat material).  Only after the war, around the early 1870s, do skirts become more subdued and narrow again, by the time of the turn of the twentieth century, dresses begin to become smaller, shorter, more revealing, and are ultimately given up in exchange for pants and jeans (this also leads to the start of women shaving legs and underarms, but that's another topic for a different time and someone else's blog).  But I digress...all of that history simply to say that there is not a wide array of patterns available for my time period, 1847, but there are many museums that display 1840s collections online, and from that I am able to study and create my design.

Here are some dress styles that I really like:

Good use of pattern, bold and just beautiful:
I like the sleeve caps of these dresses:
I plan to continue using a v-shaped bodice and button front closure:
I will also use some piping and darts on the bodice.  Here is the design idea that I've come up with:
My fabric.  Absolutely love this.
Sketch of front and back of the dress.  Simple, but appropriate.
Because of the bold pattern of the fabric I purchased, I thought a simpler design might be better.  The previous work dress I designed was also patterned, but it was a bit more muted, and the details that I added were not lost in the pattern.

Clothing in the 1840s were all hand-sewn; sewing machines were not yet found in homes.  They had been invented, but were very new, and therefore, very expensive!  They were not commonplace in homes across America until after the Civil War.  It's a good way to figure out the date of a dress if the style is plain, or uncommon to a certain time period--was it hand-sewn, or machine stitched?  For the sake of time, I'll sew all unseen hems with my sewing machine.  Trims, hems and button holes will all be done by hand.  It's been four years since I did this last...wish me luck, and I'll keep you posted!

Sunday, January 27

Ironing Board Cover Tutorial

Proverbs 31:27, NASB:  "She looks well to the ways of her household, and does not eat the bread of idleness."

My weeks are pretty typical, with work and housework and fun on the weekend.  Every week, my Fridays, which I am fortunate to have off, are usually my housework days, when I accomplish the housework that I don't feel like doing during the week, but want to get done before the weekend's festivities. This always includes a pile of ironing to do for my husband.  I hate ironing--it's right up there with cleaning the bathroom on my list of Worst Hated Housework Jobs.  I've known for a while that my ironing board cover was on its last threads, so to speak, but today confirmed that it is time to either get or make a new cover.
I've actually worn through the fabric in one spot, and the foam underneath is literally falling apart, a diamond-shaped piece at a time.  I noticed as I was ironing that there was a piece of foam on the floor, so I picked it up and threw it away.  No big deal.  Then, another appeared.  I picked it up and threw it away.  Then, another...and so I looked at the underside of the cover:
My foam stalactites
Cute little foam diamond
Huh.  I had ironed the foam so much that it was actually squeezing through the diamond-shape openings like frosting through a piping bag.  I never realized that it could do that.

The cover is maybe a few years old.  The board, probably a few years older.  Still, not that old.  I think I got it from Wal-Mart, and it's pretty sturdy, so I don't want to get a new board, nor do I need to replace it, because it's in good shape.  And, I'd like to mention here, it's a standard-sized board.  So, when I looked at Wal-Mart for a replacement cover, I found it strange that the standard covers that they carry are made to fit standard boards, which are not the size that I own.  The dimensions aren't off by much, but it's enough to make the cover impossible to iron on, because the standard covers are actually larger than my board (which, as I said, is not that old).  I've looked at other chain stores, and they all carry the same standard size ironing board covers, which don't fit my standard-sized board.  Insert sad music here.  Which leaves me only one option: to get my craft on!

I've wanted to create a pattern specific to my board for a while, but procrastination or other projects always seemed to steal me away.  Now with the disintegration of my current cover, it seems to be a great time to do this.  I thought that perhaps others might be in the same boat, so I wanted to share my process for creating a new cover!

Let me start by saying that I have two patterns from McCall's or Simplicity or Butterick or something in my cabinet.  I like to buy patterns when they go on sale for 99 cents at the local craft stores.  I have no intention of using them, though.  I will be doing this my way.

You'll need:
*Pattern paper (I get mine at Jo Ann Fabrics when it goes on sale for $1 a yard)--if you don't have any, tissue paper can work in a pinch
* Home decor fabric of your choice (you can use lighter weight fabric, but home decor fabric is made to stand up to more wear and tear, so it should last longer)
*1/8" or 1/4" thick cushion foam (your preference) this was a lot more expensive than I expected!
*Package of 72" x 90" cotton batting
*Heat reflecting fabric (I purchased 7/8 yd. of 44" wide fabric)
* 1/2" wide, 4.5 yard package elastic
*Thread

My process:
I had a piece of pattern paper that was slightly smaller in length than the ironing board, which I worked around.  I laid out the paper on the floor, and collapsed my board flat.  I turned it upside down and laid it on the pattern paper.
Then, I took a Sharpie and traced around the board with the cover on.  I cut a piece from the extra paper and put it under the front part of the board, where the paper fell a little short, and taped it in place.  Then I did some measurements:
I measured the length of the board and the width of the board, then added 4" to the measurements for the edges that will stretch underneath.  I wrote down my measurements:
I took a stab at the amount of elastic I need...the measurement is one-third smaller than the total length of all four sides of the board.  I'll have to see how it stretches and how tight it will be.  I want it as tight as possible around the edges, to prevent the fabric from slipping around and wrinkling under the clothes.

While at the fabric store, the fabric cutter asked me what I was making.  When I told her, she started giving me suggestions about what else I would need, and what could be subbed for the foam.  It was her suggestion to add the heat-reflective fabric and the cotton batting, since both were on sale.  Thanks you, fabric cutter at Jo Ann Fabrics.  These are great (and more cost-effective) solutions!
I opened the batting to full size, then folded it in half.  Then I folded it in half again, which gave me four thicknesses of batting.  I placed the board pattern on top, and measured an inch out from the pattern.
If you don't have one of these handy little metal rulers with the sliding guide, you really need one.  I've used this so much over the years!

Cut out along the 1" marks you just made, and set your batting aside for now.

Then cut the heat reflective fabric in half width-wise, into two 22" wide by 16" long pieces.  Pin the two ends together, making sure to account for the 5/8" seam that will be made when you sew the two pieces together.
Lay this flat and lay the pattern onto the heat shield fabric.  Measure an inch past the pattern, then cut this out according to the dash marks.  Set this piece aside.
Then it was time to cut the fabric.  I'm always afraid of this part when I venture into one of my "mind projects".  I am not the kind of person who likes using patterns--I've sewn so many things by making my own patterns and putting it together in a way that makes sense to me--but I can't help but second-guess every detail of my pattern in my head a few times before I finally get up the courage to cut.  But finally, I made the move.
Me staring at the fabric with fear and dread.
Wow, the colors are waaay off in this picture.  I think because of the window.  The wall looks peach, but is actually a cheerful yellow.
(A note here: I allowed an extra 2" on each side of the board for the elastic.  It wasn't enough, so I would recommend a minimum of 3" overhang on each side for an elastic casing around the edges.  So I cut 1 1/2" strips that will later be sewn around the entire piece of fabric to encase the elastic.)

Now, sew the seam into the heat-resistant fabric.  Iron the seam open.
Next, layer the heat-resistant fabric below the first layer of batting, so that you have three layers below the heat shield and one layer above.  Be sure that the gray side of the heat-resistant fabric is facing up!
Pin all layers together, and sew a 5/8" seam around the entire perimeter of the batting.  This will help all of the layers stay in place while you are ironing.  You may want to check your machine after doing this to make sure that you don't have too much lint from the batting in the bobbin area.  Trim the excess off.
Now, make the casing for your elastic.  In my pictures, I am showing the fabric strips that I cut for the casing, but if you cut the extra out as all one piece, then you simply fold the fabric under 1/4" along the edges, iron flat, then fold the fabric under again 5/8", enclosing the raw edge in the fabric casing.  Be sure to leave an opening at the back edge of the casing to insert and run the elastic through.
Because I had an exposed edge, and the fabric was prone to fraying, I sewed a zigzag stitch along the entire edge.
Don't be like me, though, and find fun new ways to create fishing hooks with your sewing machine:
This little mistake was a ten minute delay in my sewing.  Frowny face.

Once you have your casing sewn, this is where a bodkin (I think that's what these are called--I usually call it a threader) comes in handy. 
I used the blue threader, because of the amount of fabric that I would be pulling the elastic through.  Thread your bodkin and begin to pull it through the casing.  I was having a hard time keeping the elastic in the eye, so I came up with this solution:
I taped the elastic to the threader with Scotch tape, which created a smooth surface to pull through the casing.  Worked great!

Once you get the elastic through the casing, you need to try the cover on the board with the batting underneath.  Use a safety pin to hold the elastic together and keep it from slipping into the casing, and stretch the cover over the board.  Then take your elastic and pull it as tightly as you want it to be, making sure that it will securely hold the cover in place while you are ironing.  Remove your safety pin and re-pin the elastic where you have tightened it.  This will mark where you will sew the elastic together.
Take the cover off and cut the extra elastic off.  Pin the elastic in place, then sew these ends together, creating a square with the thread and reinforcing it two or three times.  This is where the elastic is most vulnerable to breaking, so you want it to be as secure as possible.
Huh, I meant to take a picture of that.  Apparently I forgot to do so.

Hand-stitch or machine sew the casing closed where the elastic was inserted.  You're done!
You can make this with foam; I opted for this way since the foam in my last cover just completely disintegrated.  This seemed like a better option, and it was half the cost of the foam pad.  All total with sale prices and discounts, the total for this project came to $37, but thanks to my sister and brother-in-law, I had a $25 gift card for Jo Ann Fabrics from Christmas to use.  Plus, I got an e-mail coupon for 15% off of my total purchase, which helped to get the total cost down to $31.  Because of all of that, I spent $6 of my own money.  Not bad for a custom-fitted cover!  I would have paid more than that at Wal-Mart, and had a fraction of the quality.

Ironing is fun again!
Well, maybe not.  But it is prettier!

ShareThis