Hubby was away this weekend for some male bonding with his brother. I had the house to myself from Friday night until Sunday afternoon, so I took the opportunity to get some things done around the house!
Friday night was dreary and rainy. I felt like I'd been awake for forever for some reason, and didn't have much motivation or energy. Usually when I'm alone for dinner, I put minimal effort into my meals, and this was no exception. Here is a picture of my dinner: fish sticks, mac and cheese, and sweet carrots. Pretty easy. I hate to admit it, but I love fish sticks. But only a certain kind.
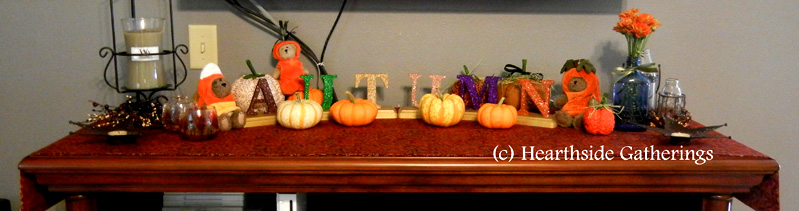
I did, however, find the motivation to finish my second set of letter decorations!
I used the same techniques that I described in my post for the
Winter wall plaque. The only difference, obviously, is that I affixed the letters upright to individual stands, so that each letter can be placed where and how I please. It's too cold out to spray the letters with the glossy sealer, so that will have to wait until another time. I placed them on top of our fireplace mantle with my pumpkins and Boyd's fall bears (including Gourdon Punkinpeeker--how cute is that name??), and I think it looks great.
Saturday was my day of work. After waking up in a chilly house again, I decided to turn on the furnace to get the chill out of the air (insert the hubs rolling his eyes here). I did some cleaning and housework, then moved to the kitchen. I think the kitchen is my favorite place in the house. I can work in there and see things get accomplished. I can experiment with recipes, or make a favorite. I can make my house smell like
home. I can make my hubby happy with the work I do in the kitchen. Is that cliche? I wouldn't necessarily say that the way to my husband's heart is through his stomach, but I do know that he is (nine times out of ten) happy with what I make in the kitchen.
So, I started out with making a batch of croutons from a loaf of bread I froze a while ago. Then, I moved on to making some hard-boiled eggs for my lunch salads and baked potatoes to go with my salads. Here are some pictures, because I know no one has ever seen these things.
Then I made a half batch of scotcharoos for the hubs. I made the mistake earlier in the week by saying that those sounded good and I would have made them then, but I realized that I had no Rice Krispies, which stopped that idea in its tracks until I got paid and went to the grocery and bought a box.
Then I ate some Milano double chocolate cookies.
Finally, with those things behind me, I was ready to start on my pie pumpkins. I found
this website a long time ago that had some great directions for making pumpkin pies and crust from scratch, and it's been my reference ever since. I've made a few pumpkin pies this way (and we really like the crust recipe here), but I think that the hubs likes the canned pumpkin better, so I'll be using this puree in baking recipes, like cookies and muffins.
I started by washing the dirt off of all of the pumpkins. I used a vegetable scrubber to get off a lot of the caked-on dirt. I spread an old full-sized bath towel over the counterspace where I would be working, and set each pumpkin on the towel to dry a bit before I started the pumpkin carnage. For reference, each pumpkin averaged around four pounds.
Get out your tools. I used a large serrated knife, an ice cream scoop, and a teaspoon to scoop out the innards and seeds:
I cut the pumpkin apart into large pieces, usually two or three, and then scooped out the stringy parts and seeds. I placed those into a large bowl, because we want to keep the seeds to bake and eat later!
Once the first pumpkin was scooped clean, I cut it up into smaller pieces and piled them into a large, microwave-safe bowl. I poured enough water to come up about a third of the way from the bottom of the bowl, then covered the bowl with plastic wrap, leaving a small opening to vent some of the steam.
I started microwaving the pumpkin for 15 minutes. As that was cooking, I went to work carving up more pumpkins.
Now that's some serious punkin chunkin'.
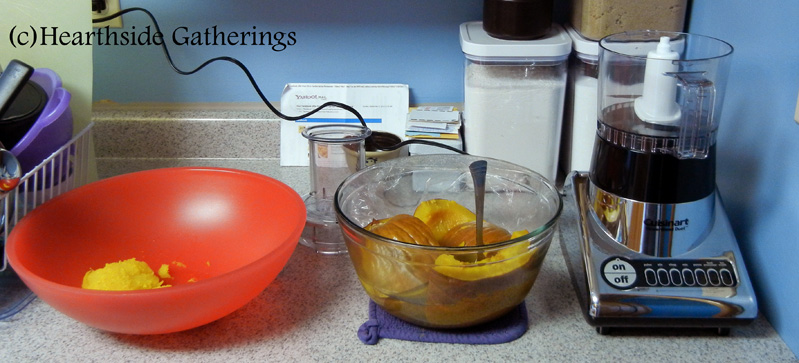
When the microwave was done, I checked the pumpkin with a fork to see if it was done. It was, so I transferred it to a large bowl in another work station, the puree place. (If they are not quite done after fifteen minutes, just put the plastic back on and microwave in five minute increments until they are done.)
You can do this step a few different ways: take the pieces out and put them in a bowl to let them cool a bit so that they are easier to handle, or take each piece out and scrape the pumpkin away from the skin with a spoon. I used the spoon method. You'll know that your pumpkin is sufficiently cooked when the skin peels off of the meat easily. If you want to wait and be able to hold it and peel the skin off with your fingers, the peel should really just lift off.
Once I had one pumpkin peeled, I began pureeing it in my food processor. I then scooped the puree into a large bowl, and just cooked, peeled, and pureed my way through the afternoon. When I had finally cut up all of the pumpkins, I went to work separating the seeds from the pulp in another bowl. That took quite a while...I didn't think that such small pumpkins would have so much inside of them!
Oh, and don't be like me and drop the food processor blade into the puree when you're trying to scoop everything into the bowl. Messy. But the pumpkin sure tasted sweet!
Once you finish with pureeing the pumpkins, let the bowl cool down a bit before putting it in freezer bags. I took this opportunity to eat dinner. When it has cooled down to almost room temperature, then it's time to start putting it into freezer bags. I did mine in two-cup increments per bag. I ended up with 17 1/2 cups of pumpkin, or 8 (2 cup) bags and one (1 1/2 cup) bag. Not too bad for four little pumpkins!
When all of the puree had been bagged and finally stored in the deep freezer and the kitchen counter was clear, I spread out wax paper and poured my rinsed and drained pumpkin seeds on top to air dry overnight. I tried to pat them dry a little with a paper towel, but that didn't work very well, so I wouldn't recommend it. I did move them around after a few hours of sitting out to prevent them from sticking too much to the wax paper.
You know how guys like to keep antlers as a trophy of their hunting conquests? Well, here are my trophies:
Yeah, I totally conquered those pumpkins.
So, you ask, what do I do with the pumpkin seeds when I bake them? Well, I'm glad you asked (even if you really didn't)! Here's what I do to roast my pumpkin seeds:
It's really simple. I preheat the oven to 325 degrees, then I put the seeds in a medium sized bowl. I spray a coating of olive oil spray on the seeds, then stir them around to coat all of them. I also spray a large baking sheet (one with shallow sides) with the same cooking spray, to prevent sticking. Then I arrange a single layer of the seeds on the sheet, and sprinkle them with seasoning salt.
I stir the seeds around on the baking sheet to get the salt on all of the seeds, then rearrange them back into a single layer. I bake them at 325 degrees for 20 minutes, then take the pan out and stir them around a bit. I put the baking sheet back in the oven for another 10 minutes, then remove and stir again.
Taste one at this point, to see if they are baked enough for you. They should be crunchy and light golden brown. If they are not to this point, continue to bake and check them in 5 minute increments until they are the right crunchiness for you. A tasty and healthy treat!
Well, if you are still reading this post, I commend you! It's a long one. As a reward, here is Owl corner!
Owl Corner: Barred Owls
 |
| Photo from Wikipedia |
The barred owl is found across most of the eastern half of the United States and up into Canada. Its distinct brown streaks across the feathers are what gives it its name. It's a small to medium-sized owl, measuring around 10 inches in height. These owls usually prey on small animals, including voles, rats and rabbits, and even other smaller owls (what is with birds eating other birds? Maybe we should say it's a bird-eat-bird world, because I've never heard of dogs eating each other), snakes, some amphibians, and even fish. Like other species of owl, these owls are also paired for life with one mate, and will lay 2-4 eggs at one time. These owls are expanding their territories farther west, where they seem to invade other owl habitats, and are not considered to be in danger of extinction.
Information for the Owl Corner from owling.com and allaboutbirds.org.


